Salesforce OmniAuth Provider (FREE SELF)
You can integrate your GitLab instance with Salesforce to enable users to log in to your GitLab instance with their Salesforce account.
Create a Salesforce Connected App
To enable Salesforce OmniAuth provider, you must use Salesforce's credentials for your GitLab instance. To get the credentials (a pair of Client ID and Client Secret), you must create a Connected App on Salesforce.
-
Sign in to Salesforce.
-
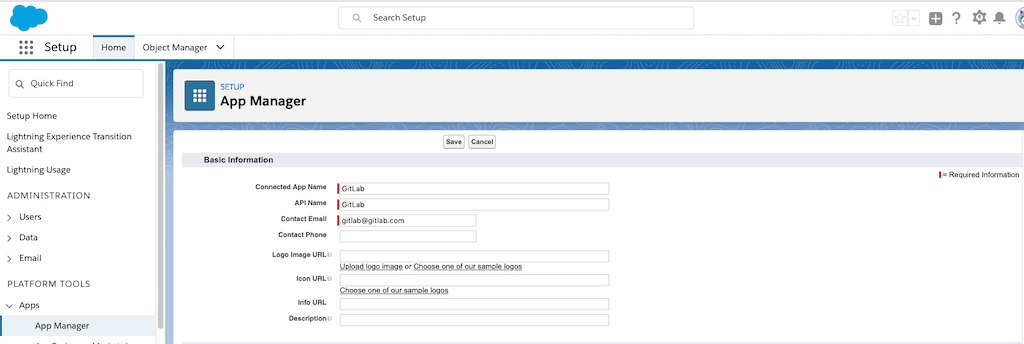
In Setup, enter
App Managerin the Quick Find box, click App Manager, then click New Connected App. -
Fill in the application details into the following fields:
-
Connected App Name and API Name: Set to any value but consider something like
<Organization>'s GitLab,<Your Name>'s GitLab, or something else that is descriptive. - Contact Email: Enter the contact email for Salesforce to use when contacting you or your support team.
- Description: Description for the application.

-
Connected App Name and API Name: Set to any value but consider something like
-
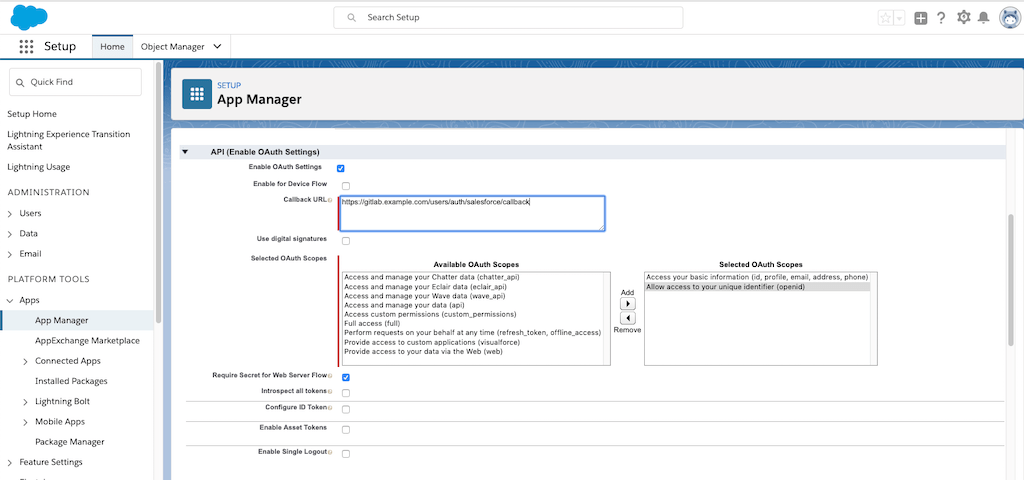
Select API (Enable OAuth Settings) and click on Enable OAuth Settings.
-
Fill in the application details into the following fields:
-
Callback URL: The callback URL of your GitLab installation. For example,
https://gitlab.example.com/users/auth/salesforce/callback. -
Selected OAuth Scopes: Move
Access your basic information (id, profile, email, address, phone)andAllow access to your unique identifier (openid)to the right column.
-
Callback URL: The callback URL of your GitLab installation. For example,
-
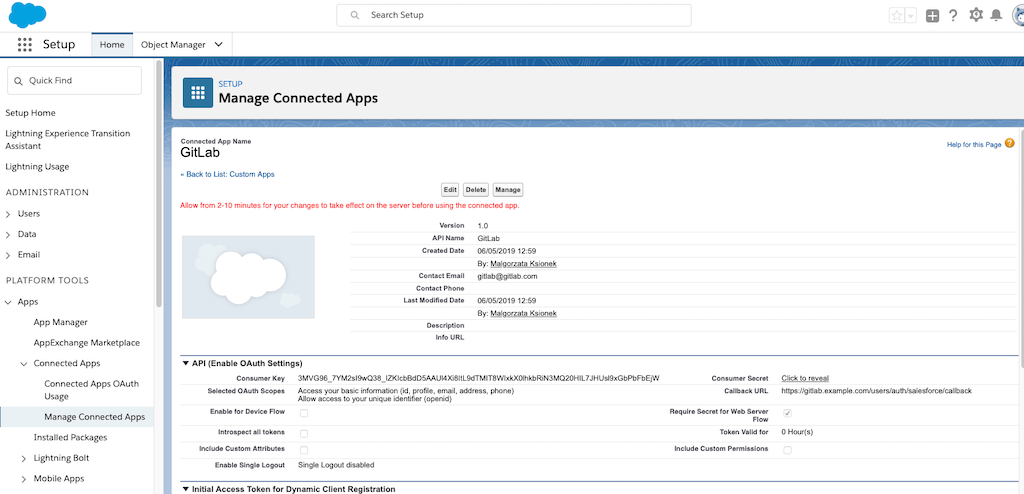
Click Save.
-
On your GitLab server, open the configuration file.
For Omnibus package:
sudo editor /etc/gitlab/gitlab.rbFor installations from source:
cd /home/git/gitlab sudo -u git -H editor config/gitlab.yml -
See Configure initial settings for initial settings.
-
Add the provider configuration:
For Omnibus package:
gitlab_rails['omniauth_providers'] = [
  {
    name: "salesforce",
    # label: "Provider name", # optional label for login button, defaults to "Salesforce"
    app_id: "SALESFORCE_CLIENT_ID",
    app_secret: "SALESFORCE_CLIENT_SECRET"
  }
]
For installation from source:
- { name: 'salesforce', # label: 'Provider name', # optional label for login button, defaults to "Salesforce" app_id: 'SALESFORCE_CLIENT_ID', app_secret: 'SALESFORCE_CLIENT_SECRET' } -
Change
SALESFORCE_CLIENT_IDto the Consumer Key from the Salesforce connected application page. -
Change
SALESFORCE_CLIENT_SECRETto the Consumer Secret from the Salesforce connected application page. -
Save the configuration file.
-
Reconfigure GitLab or restart GitLab for the changes to take effect if you installed GitLab via Omnibus or from source respectively.
On the sign in page, there should now be a Salesforce icon below the regular sign in form. Click the icon to begin the authentication process. Salesforce asks the user to sign in and authorize the GitLab application. If everything goes well, the user is returned to GitLab and is signed in.
NOTE: GitLab requires the email address of each new user. After the user is signed in using Salesforce, GitLab redirects the user to the profile page where they must provide the email and verify the email.