DAST API (ULTIMATE)
You can add dynamic application security testing (DAST) of web APIs to your GitLab CI/CD pipelines. This helps you discover bugs and potential security issues that other QA processes may miss.
We recommend that you use DAST API testing in addition to GitLab Secure's other security scanners and your own test processes. If you're using GitLab CI/CD, you can run DAST API tests as part your CI/CD workflow.
WARNING: Do not run DAST API testing against a production server. Not only can it perform any function that the API can, it may also trigger bugs in the API. This includes actions like modifying and deleting data. Only run DAST API against a test server.
You can run DAST API scanning against the following web API types:
- REST API
- SOAP
- GraphQL
- Form bodies, JSON, or XML
When DAST API scans run
DAST API scanning runs in the dast stage by default. To ensure DAST API scanning examines the latest
code, ensure your CI/CD pipeline deploys changes to a test environment in a stage before the dast
stage.
If your pipeline is configured to deploy to the same web server on each run, running a pipeline while another is still running could cause a race condition in which one pipeline overwrites the code from another. The API to be scanned should be excluded from changes for the duration of a DAST API scan. The only changes to the API should be from the DAST API scanner. Changes made to the API (for example, by users, scheduled tasks, database changes, code changes, other pipelines, or other scanners) during a scan could cause inaccurate results.
Example DAST API scanning configurations
The following projects demonstrate DAST API scanning:
- Example OpenAPI v2 Specification project
- Example HTTP Archive (HAR) project
- Example Postman Collection project
- Example GraphQL project
- Example SOAP project
Targeting API for DAST scanning
You can specify the API you want to scan by using:
OpenAPI Specification
- Support for OpenAPI Specification using YAML format was introduced in GitLab 14.0.
- Support to generate media type
application/xmlwas introduced in GitLab 14.8.- Support to media types was introduced in GitLab 14.10.
The OpenAPI Specification (formerly the Swagger Specification) is an API description format for REST APIs. This section shows you how to configure DAST API scanning using an OpenAPI Specification to provide information about the target API to test. OpenAPI Specifications are provided as a file system resource or URL. Both JSON and YAML OpenAPI formats are supported.
DAST API uses an OpenAPI document to generate the request body. When a request body is required, the body generation is limited to these body types:
application/x-www-form-urlencodedmultipart/form-dataapplication/jsonapplication/xml
OpenAPI and media types
A media type (formerly known as MIME type) is an identifier for file formats and format contents transmitted. A OpenAPI document lets you specify that a given operation can accept different media types, hence a given request can send data using different file content. As for example, a PUT /user operation to update user data could accept data in either XML (media type application/xml) or JSON (media type application/json) format.
OpenAPI 2.x lets you specify the accepted media types globally or per operation, and OpenAPI 3.x lets you specify the accepted media types per operation. DAST API will check the listed media types, and try to produce sample data for each supported media type.
- In GitLab 14.10 and later, the default behavior is to select one of the supported media types to use. The first supported media type is chosen from the list. This behavior is configurable.
- In GitLab 14.9 and earlier, the default behavior is to perform testing using all supported media types. This means if two media types are listed (for example,
application/jsonandapplication/xml), testing are performed using JSON, and then the same tests using XML.
Testing the same operation (for example, POST /user) using different media types (for example, application/json and application/xml) is not always desirable.
For example, if the target application executes the same code regardless of the request content type, it will take longer to finish the test session, and it may report duplicated vulnerabilities related to the request body depending on the target app.
The environment variable DAST_API_OPENAPI_ALL_MEDIA_TYPES lets you specify whether or not to use all supported media types instead of one when generating requests for a given operation. When the environment variable DAST_API_OPENAPI_ALL_MEDIA_TYPES is set to any value, DAST API tries to generate requests for all supported media types instead of one in a given operation. This will cause testing to take longer as testing is repeated for each provided media type.
Alternatively, the variable DAST_API_OPENAPI_MEDIA_TYPES is used to provide a list of media types that will each be tested. Providing more than one media type causes testing to take longer, as testing is performed for each media type selected. When the environment variable DAST_API_OPENAPI_MEDIA_TYPES is set to a list of media types, only the listed media types are included when creating requests.
Multiple media types in DAST_API_OPENAPI_MEDIA_TYPES are separated by a colon (:). For example, to limit request generation to the media types application/x-www-form-urlencoded and multipart/form-data, set the environment variable DAST_API_OPENAPI_MEDIA_TYPES to application/x-www-form-urlencoded:multipart/form-data. Only supported media types in this list are included when creating requests, though non-supported media types are always skipped. A media type text may contain different sections. For example, application/vnd.api+json; charset=UTF-8, is a compound of type "/" [tree "."] subtype ["+" suffix]* [";" parameter]. Parameters are not taken into account when performing the filtering media types on request generation.
The environment variables DAST_API_OPENAPI_ALL_MEDIA_TYPES and DAST_API_OPENAPI_MEDIA_TYPES allow you to decide how to handle media types. These settings are mutually exclusive. If both are enabled, DAST API reports an error.
Configure DAST API with an OpenAPI Specification
To configure DAST API scanning with an OpenAPI specification:
To configure DAST API scanning with an OpenAPI Specification:
-
Include the
DAST-API.gitlab-ci.ymltemplate in your.gitlab-ci.ymlfile. -
The configuration file has several testing profiles defined with different checks enabled. We recommend that you start with the
Quickprofile. Testing with this profile completes faster, allowing for easier configuration validation. Provide the profile by adding theDAST_API_PROFILECI/CD variable to your.gitlab-ci.ymlfile. -
Provide the location of the OpenAPI Specification as either a file or URL. Specify the location by adding the
DAST_API_OPENAPIvariable. -
The target API instance's base URL is also required. Provide it by using the
DAST_API_TARGET_URLvariable or anenvironment_url.txtfile.Adding the URL in an
environment_url.txtfile at your project's root is great for testing in dynamic environments. To run DAST API against an app dynamically created during a GitLab CI/CD pipeline, have the app persist its URL in anenvironment_url.txtfile. DAST API automatically parses that file to find its scan target. You can see an example of this in our Auto DevOps CI YAML.
Complete example configuration of using an OpenAPI Specification:
stages:
  - dast

include:
  - template: DAST-API.gitlab-ci.yml

variables:
  DAST_API_PROFILE: Quick
  DAST_API_OPENAPI: test-api-specification.json
  DAST_API_TARGET_URL: http://test-deployment/
This is a minimal configuration for DAST API. From here you can:
- Run your first scan.
- Add authentication.
- Learn how to handle false positives.
HTTP Archive (HAR)
The HTTP Archive format (HAR) is an archive file format for logging HTTP transactions. When used with the GitLab DAST API scanner, the HAR file must contain records of calling the web API to test. The DAST API scanner extracts all of the requests and uses them to perform testing.
You can use various tools to generate HAR files:
- Insomnia Core: API client
- Chrome: Browser
- Firefox: Browser
- Fiddler: Web debugging proxy
- GitLab HAR Recorder: Command line
WARNING: HAR files may contain sensitive information such as authentication tokens, API keys, and session cookies. We recommend that you review the HAR file contents before adding them to a repository.
DAST API scanning with a HAR file
To configure DAST API to use a HAR file that provides information about the target API to test:
-
Include the
DAST-API.gitlab-ci.ymltemplate in your.gitlab-ci.ymlfile. -
The configuration file has several testing profiles defined with different checks enabled. We recommend that you start with the
Quickprofile. Testing with this profile completes faster, allowing for easier configuration validation.Provide the profile by adding the
DAST_API_PROFILECI/CD variable to your.gitlab-ci.ymlfile. -
Provide the location of the HAR file. You can provide the location as a file path or URL. URL support was introduced in GitLab 13.10 and later. Specify the location by adding the
DAST_API_HARvariable. -
The target API instance's base URL is also required. Provide it by using the
DAST_API_TARGET_URLvariable or anenvironment_url.txtfile.Adding the URL in an
environment_url.txtfile at your project's root is great for testing in dynamic environments. To run DAST API against an app dynamically created during a GitLab CI/CD pipeline, have the app persist its URL in anenvironment_url.txtfile. DAST API automatically parses that file to find its scan target. You can see an example of this in our Auto DevOps CI YAML.
Complete example configuration of using an HAR file:
stages:
  - dast

include:
  - template: DAST-API.gitlab-ci.yml

variables:
  DAST_API_PROFILE: Quick
  DAST_API_HAR: test-api-recording.har
  DAST_API_TARGET_URL: http://test-deployment/
This is a minimal configuration for DAST API. From here you can:
- Run your first scan.
- Add authentication.
- Learn how to handle false positives.
Postman Collection
The Postman API Client is a popular tool that developers and testers use to call various types of APIs. The API definitions can be exported as a Postman Collection file for use with DAST API. When exporting, make sure to select a supported version of Postman Collection: v2.0 or v2.1.
When used with the GitLab DAST API scanner, Postman Collections must contain definitions of the web API to test with valid data. The DAST API scanner extracts all the API definitions and uses them to perform testing.
WARNING: Postman Collection files may contain sensitive information such as authentication tokens, API keys, and session cookies. We recommend that you review the Postman Collection file contents before adding them to a repository.
DAST API scanning with a Postman Collection file
To configure DAST API to use a Postman Collection file that provides information about the target API to test:
-
The configuration file has several testing profiles defined with different checks enabled. We recommend that you start with the
Quickprofile. Testing with this profile completes faster, allowing for easier configuration validation.Provide the profile by adding the
DAST_API_PROFILECI/CD variable to your.gitlab-ci.ymlfile. -
Provide the location of the Postman Collection file as either a file or URL. Specify the location by adding the
DAST_API_POSTMAN_COLLECTIONvariable. -
The target API instance's base URL is also required. Provide it by using the
DAST_API_TARGET_URLvariable or anenvironment_url.txtfile.Adding the URL in an
environment_url.txtfile at your project's root is great for testing in dynamic environments. To run DAST API against an app dynamically created during a GitLab CI/CD pipeline, have the app persist its URL in anenvironment_url.txtfile. DAST API automatically parses that file to find its scan target. You can see an example of this in our Auto DevOps CI YAML.
Complete example configuration of using a Postman collection:
stages:
  - dast

include:
  - template: DAST-API.gitlab-ci.yml

variables:
  DAST_API_PROFILE: Quick
  DAST_API_POSTMAN_COLLECTION: postman-collection_serviceA.json
  DAST_API_TARGET_URL: http://test-deployment/
This is a minimal configuration for DAST API. From here you can:
- Run your first scan.
- Add authentication.
- Learn how to handle false positives.
Postman variables
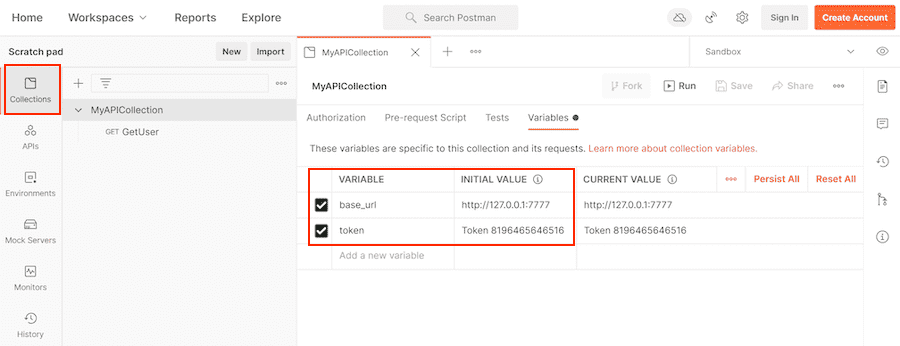
Postman allows the developer to define placeholders that can be used in different parts of the requests. These placeholders are called variables, as explained in Using variables. You can use variables to store and reuse values in your requests and scripts. For example, you can edit the collection to add variables to the document:
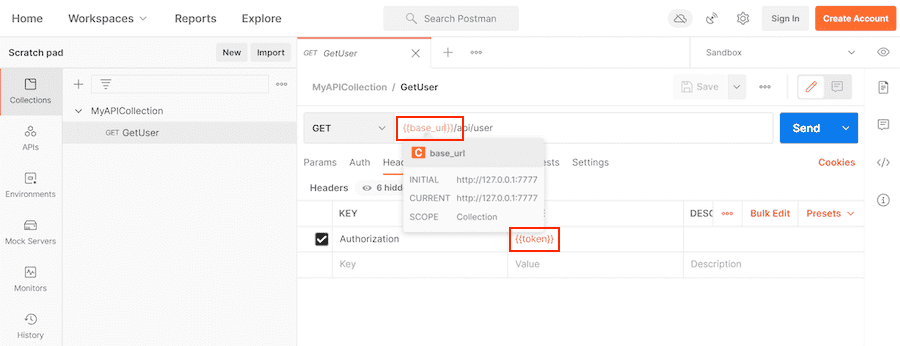
You can then use the variables in sections such as URL, headers, and others:
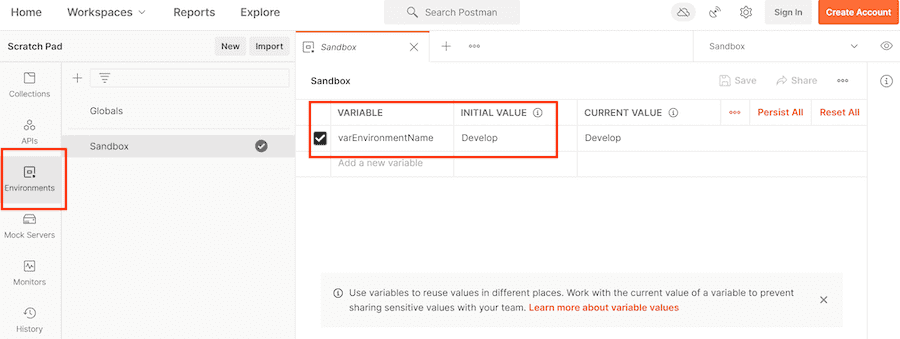
Variables can be defined at different scopes (for example, Global, Collection, Environment, Local, and Data). In this example, they're defined at the Environment scope:
When you export a Postman collection, only Postman collection variables are exported into the Postman file. For example, Postman does not export environment-scoped variables into the Postman file.
By default, the DAST API scanner uses the Postman file to resolve Postman variable values. If a JSON file
is set in a GitLab CI/CD environment variable DAST_API_POSTMAN_COLLECTION_VARIABLES, then the JSON
file takes precedence to get Postman variable values.
WARNING:
Although Postman can export environment variables into a JSON file, the format is not compatible with the JSON expected by DAST_API_POSTMAN_COLLECTION_VARIABLES.
Here is an example of using DAST_API_POSTMAN_COLLECTION_VARIABLES:
stages:
  - dast

include:
  - template: DAST-API.gitlab-ci.yml

variables:
  DAST_API_PROFILE: Quick
  DAST_API_POSTMAN_COLLECTION: postman-collection_serviceA.json
  DAST_API_POSTMAN_COLLECTION_VARIABLES: variable-collection-dictionary.json
  DAST_API_TARGET_URL: http://test-deployment/
The file variable-collection-dictionary.json is a JSON document. This JSON is an object with
key-value pairs for properties. The keys are the variables' names, and the values are the variables'
values. For example:
{
   "base_url": "http://127.0.0.1/",
   "token": "Token 84816165151"
}
Authentication
Authentication is handled by providing the authentication token as a header or cookie. You can provide a script that performs an authentication flow or calculates the token.
HTTP Basic Authentication
HTTP basic authentication
is an authentication method built in to the HTTP protocol and used in conjunction with
transport layer security (TLS).
To use HTTP basic authentication, two CI/CD variables are added to your .gitlab-ci.yml file:
-
DAST_API_HTTP_USERNAME: The username for authentication. -
DAST_API_HTTP_PASSWORD: The password for authentication.
For the password, we recommended that you create a CI/CD variable
(for example, TEST_API_PASSWORD) set to the password. You can create CI/CD variables from the
GitLab projects page at Settings > CI/CD, in the Variables section. Use that variable
as the value for DAST_API_HTTP_PASSWORD:
stages:
  - dast

include:
  - template: DAST-API.gitlab-ci.yml

variables:
  DAST_API_PROFILE: Quick
  DAST_API_HAR: test-api-recording.har
  DAST_API_TARGET_URL: http://test-deployment/
  DAST_API_HTTP_USERNAME: testuser
  DAST_API_HTTP_PASSWORD: $TEST_API_PASSWORD
Bearer tokens
Bearer tokens are used by several different authentication mechanisms, including OAuth2 and JSON Web
Tokens (JWT). Bearer tokens are transmitted using the Authorization HTTP header. To use Bearer
tokens with DAST API, you need one of the following:
- A token that doesn't expire.
- A way to generate a token that lasts the length of testing.
- A Python script that DAST API can call to generate the token.
Token doesn't expire
If the Bearer token doesn't expire, use the DAST_API_OVERRIDES_ENV variable to provide it. This
variable's content is a JSON snippet that provides headers and cookies to add to DAST API's
outgoing HTTP requests.
Follow these steps to provide the Bearer token with DAST_API_OVERRIDES_ENV:
-
Create a CI/CD variable, for example
TEST_API_BEARERAUTH, with the value{"headers":{"Authorization":"Bearer dXNlcm5hbWU6cGFzc3dvcmQ="}}(substitute your token). You can create CI/CD variables from the GitLab projects page at Settings > CI/CD, in the Variables section. Due to the format ofTEST_API_BEARERAUTHit's not possible to mask the variable. To mask the token's value, you can create a second variable with the token value's, and defineTEST_API_BEARERAUTHwith the value{"headers":{"Authorization":"Bearer $MASKED_VARIABLE"}}. -
In your
.gitlab-ci.ymlfile, setDAST_API_OVERRIDES_ENVto the variable you just created:stages: - dast include: - template: DAST-API.gitlab-ci.yml variables: DAST_API_PROFILE: Quick DAST_API_OPENAPI: test-api-specification.json DAST_API_TARGET_URL: http://test-deployment/ DAST_API_OVERRIDES_ENV: $TEST_API_BEARERAUTH -
To validate that authentication is working, run an DAST API test and review the job logs and the test API's application logs.
Token generated at test runtime
If the Bearer token must be generated and doesn't expire during testing, you can provide DAST API a file that has the token. A prior stage and job, or part of the DAST API job, can generate this file.
DAST API expects to receive a JSON file with the following structure:
{
  "headers" : {
    "Authorization" : "Bearer dXNlcm5hbWU6cGFzc3dvcmQ="
  }
}
This file can be generated by a prior stage and provided to DAST API through the
DAST_API_OVERRIDES_FILE CI/CD variable.
Set DAST_API_OVERRIDES_FILE in your .gitlab-ci.yml file:
stages:
  - dast

include:
  - template: DAST-API.gitlab-ci.yml

variables:
  DAST_API_PROFILE: Quick
  DAST_API_OPENAPI: test-api-specification.json
  DAST_API_TARGET_URL: http://test-deployment/
  DAST_API_OVERRIDES_FILE: dast-api-overrides.json
To validate that authentication is working, run an DAST API test and review the job logs and the test API's application logs.
Token has short expiration
If the Bearer token must be generated and expires prior to the scan's completion, you can provide a program or script for the DAST API scanner to execute on a provided interval. The provided script runs in an Alpine Linux container that has Python 3 and Bash installed. If the Python script requires additional packages, it must detect this and install the packages at runtime.
The script must create a JSON file containing the Bearer token in a specific format:
{
  "headers" : {
    "Authorization" : "Bearer dXNlcm5hbWU6cGFzc3dvcmQ="
  }
}
You must provide three CI/CD variables, each set for correct operation:
-
DAST_API_OVERRIDES_FILE: JSON file the provided command generates. -
DAST_API_OVERRIDES_CMD: Command that generates the JSON file. -
DAST_API_OVERRIDES_INTERVAL: Interval (in seconds) to run command.
For example:
stages:
  - dast

include:
  - template: DAST-API.gitlab-ci.yml

variables:
  DAST_API_PROFILE: Quick
  DAST_API_OPENAPI: test-api-specification.json
  DAST_API_TARGET_URL: http://test-deployment/
  DAST_API_OVERRIDES_FILE: dast-api-overrides.json
  DAST_API_OVERRIDES_CMD: renew_token.py
  DAST_API_OVERRIDES_INTERVAL: 300
To validate that authentication is working, run an DAST API test and review the job logs and the test API's application logs. See the overrides section for more information about override commands.
Configuration files
To get you started quickly, GitLab provides the configuration file
gitlab-dast-api-config.yml.
This file has several testing profiles that perform various numbers of tests. The run time of each
profile increases as the test numbers go up. To use a configuration file, add it to your
repository's root as .gitlab/gitlab-dast-api-config.yml.
Profiles
The following profiles are pre-defined in the default configuration file. Profiles can be added, removed, and modified by creating a custom configuration.
Quick
- Application Information Check
- Cleartext Authentication Check
- FrameworkDebugModeCheck
- HTML Injection Check
- Insecure Http Methods Check
- JSON Hijacking Check
- JSON Injection Check
- Sensitive Information Check
- Session Cookie Check
- SQL Injection Check
- Token Check
- XML Injection Check
Full
- Application Information Check
- Cleartext AuthenticationCheck
- CORS Check
- DNS Rebinding Check
- Framework Debug Mode Check
- HTML Injection Check
- Insecure Http Methods Check
- JSON Hijacking Check
- JSON Injection Check
- Open Redirect Check
- Sensitive File Check
- Sensitive Information Check
- Session Cookie Check
- SQL Injection Check
- TLS Configuration Check
- Token Check
- XML Injection Check
Available CI/CD variables
| CI/CD variable | Description |
|---|---|
SECURE_ANALYZERS_PREFIX |
Specify the Docker registry base address from which to download the analyzer. |
DAST_API_VERSION |
Specify DAST API container version. Defaults to 1. |
DAST_API_IMAGE_SUFFIX |
Specify a container image suffix. Defaults to none. |
DAST_API_TARGET_URL |
Base URL of API testing target. |
DAST_API_CONFIG |
DAST API configuration file. Defaults to .gitlab-dast-api.yml. |
DAST_API_PROFILE |
Configuration profile to use during testing. Defaults to Quick. |
DAST_API_EXCLUDE_PATHS |
Exclude API URL paths from testing. |
DAST_API_EXCLUDE_URLS |
Exclude API URL from testing. Introduced in GitLab 14.10. |
DAST_API_EXCLUDE_PARAMETER_ENV |
JSON string containing excluded parameters. |
DAST_API_EXCLUDE_PARAMETER_FILE |
Path to a JSON file containing excluded parameters. |
DAST_API_OPENAPI |
OpenAPI specification file or URL. |
DAST_API_OPENAPI_RELAXED_VALIDATION |
Relax document validation. Default is disabled. Introduced in GitLab 14.7. |
DAST_API_OPENAPI_ALL_MEDIA_TYPES |
Use all supported media types instead of one when generating requests. Causes test duration to be longer. Default is disabled. Introduced in GitLab 14.10. |
DAST_API_OPENAPI_MEDIA_TYPES |
Colon (:) separated media types accepted for testing. Default is disabled. Introduced in GitLab 14.10. |
DAST_API_HAR |
HTTP Archive (HAR) file. |
DAST_API_POSTMAN_COLLECTION |
Postman Collection file. |
DAST_API_POSTMAN_COLLECTION_VARIABLES |
Path to a JSON file to extract postman variable values. |
DAST_API_OVERRIDES_FILE |
Path to a JSON file containing overrides. |
DAST_API_OVERRIDES_ENV |
JSON string containing headers to override. |
DAST_API_OVERRIDES_CMD |
Overrides command. |
DAST_API_OVERRIDES_CMD_VERBOSE |
When set to any value. It shows overrides command output as part of the job output. Introduced in GitLab 14.6. |
DAST_API_PRE_SCRIPT |
Run user command or script before scan session starts. |
DAST_API_POST_SCRIPT |
Run user command or script after scan session has finished. |
DAST_API_OVERRIDES_INTERVAL |
How often to run overrides command in seconds. Defaults to 0 (once). |
DAST_API_HTTP_USERNAME |
Username for HTTP authentication. |
DAST_API_HTTP_PASSWORD |
Password for HTTP authentication. |
DAST_API_SERVICE_START_TIMEOUT |
How long to wait for target API to become available in seconds. Default is 300 seconds. |
DAST_API_TIMEOUT |
How long to wait for API responses in seconds. Default is 30 seconds. |
Overrides
DAST API provides a method to add or override specific items in your request, for example:
- Headers
- Cookies
- Query string
- Form data
- JSON nodes
- XML nodes
You can use this to inject semantic version headers, authentication, and so on. The authentication section includes examples of using overrides for that purpose.
Overrides use a JSON document, where each type of override is represented by a JSON object:
{
  "headers": {
    "header1": "value",
    "header2": "value"
  },
  "cookies": {
    "cookie1": "value",
    "cookie2": "value"
  },
  "query":      {
    "query-string1": "value",
    "query-string2": "value"
  },
  "body-form":  {
    "form-param1": "value",
    "form-param2": "value"
  },
  "body-json":  {
    "json-path1": "value",
    "json-path2": "value"
  },
  "body-xml" :  {
    "xpath1":    "value",
    "xpath2":    "value"
  }
}
Example of setting a single header:
{
  "headers": {
    "Authorization": "Bearer dXNlcm5hbWU6cGFzc3dvcmQ="
  }
}
Example of setting both a header and cookie:
{
  "headers": {
    "Authorization": "Bearer dXNlcm5hbWU6cGFzc3dvcmQ="
  },
  "cookies": {
    "flags": "677"
  }
}
Example usage for setting a body-form override:
{
  "body-form":  {
    "username": "john.doe"
  }
}
The override engine uses body-form when the request body has only form-data content.
Example usage for setting a body-json override:
{
  "body-json":  {
    "$.credentials.access-token": "iddqd!42.$"
  }
}
Note that each JSON property name in the object body-json is set to a JSON Path
expression. The JSON Path expression $.credentials.access-token identifies the node to be
overridden with the value iddqd!42.$. The override engine uses body-json when the request body
has only JSON content.
For example, if the body is set to the following JSON:
{
    "credentials" : {
        "username" :"john.doe",
        "access-token" : "non-valid-password"
    }
}
It is changed to:
{
    "credentials" : {
        "username" :"john.doe",
        "access-token" : "iddqd!42.$"
    }
}
Here's an example for setting a body-xml override. The first entry overrides an XML attribute and
the second entry overrides an XML element:
{
  "body-xml" :  {
    "/credentials/@isEnabled": "true",
    "/credentials/access-token/text()" : "iddqd!42.$"
  }
}
Note that each JSON property name in the object body-xml is set to an
XPath v2
expression. The XPath expression /credentials/@isEnabled identifies the attribute node to override
with the value true. The XPath expression /credentials/access-token/text() identifies the
element node to override with the value iddqd!42.$. The override engine uses body-xml when the
request body has only XML
content.
For example, if the body is set to the following XML:
<credentials isEnabled="false">
  <username>john.doe</username>
  <access-token>non-valid-password</access-token>
</credentials>
It is changed to:
<credentials isEnabled="true">
  <username>john.doe</username>
  <access-token>iddqd!42.$</access-token>
</credentials>
You can provide this JSON document as a file or environment variable. You may also provide a command to generate the JSON document. The command can run at intervals to support values that expire.
Using a file
To provide the overrides JSON as a file, the DAST_API_OVERRIDES_FILE CI/CD variable is set. The path is relative to the job current working directory.
Here's an example .gitlab-ci.yml:
stages:
  - dast

include:
  - template: DAST-API.gitlab-ci.yml

variables:
  DAST_API_PROFILE: Quick
  DAST_API_OPENAPI: test-api-specification.json
  DAST_API_TARGET_URL: http://test-deployment/
  DAST_API_OVERRIDES_FILE: dast-api-overrides.json
Using a CI/CD variable
To provide the overrides JSON as a CI/CD variable, use the DAST_API_OVERRIDES_ENV variable.
This allows you to place the JSON as variables that can be masked and protected.
In this example .gitlab-ci.yml, the DAST_API_OVERRIDES_ENV variable is set directly to the JSON:
stages:
  - dast

include:
  - template: DAST-API.gitlab-ci.yml

variables:
  DAST_API_PROFILE: Quick
  DAST_API_OPENAPI: test-api-specification.json
  DAST_API_TARGET_URL: http://test-deployment/
  DAST_API_OVERRIDES_ENV: '{"headers":{"X-API-Version":"2"}}'
In this example .gitlab-ci.yml, the SECRET_OVERRIDES variable provides the JSON. This is a
group or instance level CI/CD variable defined in the UI:
stages:
  - dast

include:
  - template: DAST-API.gitlab-ci.yml

variables:
  DAST_API_PROFILE: Quick
  DAST_API_OPENAPI: test-api-specification.json
  DAST_API_TARGET_URL: http://test-deployment/
  DAST_API_OVERRIDES_ENV: $SECRET_OVERRIDES
Using a command
If the value must be generated or regenerated on expiration, you can provide a program or script for the DAST API scanner to execute on a specified interval. The provided command runs in an Alpine Linux container that has Python 3 and Bash installed.
You have to set the environment variable DAST_API_OVERRIDES_CMD to the program or script you would like
to execute. The provided command creates the overrides JSON file as defined previously.
You might want to install other scripting runtimes like NodeJS or Ruby, or maybe you need to install a dependency for
your overrides command. In this case, we recommend setting the DAST_API_PRE_SCRIPT to the file path of a script which
provides those prerequisites. The script provided by DAST_API_PRE_SCRIPT is executed once, before the analyzer starts.
See the Alpine Linux package management page for information about installing Alpine Linux packages.
You must provide three CI/CD variables, each set for correct operation:
-
DAST_API_OVERRIDES_FILE: File generated by the provided command. -
DAST_API_OVERRIDES_CMD: Overrides command in charge of generating the overrides JSON file periodically. -
DAST_API_OVERRIDES_INTERVAL: Interval in seconds to run command.
Optionally:
-
DAST_API_PRE_SCRIPT: Script to install runtimes or dependencies before the scan starts.
stages:
  - dast

include:
  - template: DAST-API.gitlab-ci.yml

variables:
  DAST_API_PROFILE: Quick
  DAST_API_OPENAPI: test-api-specification.json
  DAST_API_TARGET_URL: http://test-deployment/
  DAST_API_OVERRIDES_FILE: dast-api-overrides.json
  DAST_API_OVERRIDES_CMD: renew_token.py
  DAST_API_OVERRIDES_INTERVAL: 300
Debugging overrides
Introduced in GitLab 14.8.
By default the output of the overrides command is hidden. If the overrides command returns a non zero exit code, the command is displayed as part of your job output. Optionally, you can set the variable DAST_API_OVERRIDES_CMD_VERBOSE to any value in order to display overrides command output as it is generated. This is useful when testing your overrides script, but should be disabled afterwards as it slows down testing.
It is also possible to write messages from your script to a log file that is collected when the job completes or fails. The log file must be created in a specific location and following a naming convention.
Adding some basic logging to your overrides script is useful in case the script fails unexpectedly during normal running of the job. The log file is automatically included as an artifact of the job, allowing you to download it after the job has finished.
Following our example, we provided renew_token.py in the environment variable DAST_API_OVERRIDES_CMD. Please notice two things in the script:
- Log file is saved in the location indicated by the environmental variable
CI_PROJECT_DIR. - Log file name should match
gl-*.log.
#!/usr/bin/env python

# Example of an overrides command

# Override commands can update the overrides json file
# with new values to be used.  This is a great way to
# update an authentication token that will expire
# during testing.

import logging
import json
import os
import requests
import backoff

# [1] Store log file in directory indicated by env var CI_PROJECT_DIR
working_directory = os.environ['CI_PROJECT_DIR']

# [2] File name should match the pattern: gl-*.log
log_file_path = os.path.join(working_directory, 'gl-user-overrides.log')

# Set up logger
logging.basicConfig(filename=log_file_path, level=logging.DEBUG)

# Use `backoff` decorator to retry in case of transient errors.
@backoff.on_exception(backoff.expo,
                      (requests.exceptions.Timeout,
                       requests.exceptions.ConnectionError),
                       max_time=30)
def get_auth_response():
    return requests.get('https://authorization.service/api/get_api_token', auth=(os.environ['AUTH_USER'], os.environ['AUTH_PWD']))

# In our example, access token is retrieved from a given endpoint
try:

    # Performs a http request, response sample:
    # { "Token" : "b5638ae7-6e77-4585-b035-7d9de2e3f6b3" }
    response = get_auth_response()

    # Check that the request is successful. may raise `requests.exceptions.HTTPError`
    response.raise_for_status()

    # Gets JSON data
    response_body = response.json()

# If needed specific exceptions can be caught
# requests.ConnectionError                  : A network connection error problem occurred
# requests.HTTPError                        : HTTP request returned an unsuccessful status code. [Response.raise_for_status()]
# requests.ConnectTimeout                   : The request timed out while trying to connect to the remote server
# requests.ReadTimeout                      : The server did not send any data in the allotted amount of time.
# requests.TooManyRedirects                 : The request exceeds the configured number of maximum redirections
# requests.exceptions.RequestException      : All exceptions that related to Requests
except requests.exceptions.RequestException as requests_error:
    # logs  exceptions  related to `Requests`
    logging.error(f'Error, failed while performing HTTP request. Error message: {requests_error}')
    raise
except requests.exceptions.JSONDecodeError as json_decode_error:
    # logs errors related decoding JSON response
    logging.error(f'Error, failed while decoding JSON response. Error message: {json_decode_error}')
    raise
except Exception as e:
    # logs any other error
    logging.error(f'Error, unknown error while retrieving access token. Error message: {e}')
    raise

# computes object that holds overrides file content.
# It uses data fetched from request
overrides_data = {
    "headers": {
        "Authorization": f"Token {response_body['Token']}"
    }
}

# log entry informing about the file override computation
# the location of the overrides json file is also CI_PROJECT_DIR
overrides_file_path = os.path.join(
    working_directory, "dast-api-overrides.json")
logging.info("Creating overrides file: %s" % overrides_file_path)

# attempts to overwrite the file
try:
    if os.path.exists(overrides_file_path):
        os.unlink(overrides_file_path)

    # overwrites the file with our updated dictionary
    with open(overrides_file_path, "wb+") as fd:
        fd.write(json.dumps(overrides_data).encode('utf-8'))
except Exception as e:
    # logs any other error
    logging.error(f'Error, unkown error when overwritng file {overrides_file_path}. Error message: {e}')
    raise

# logs informing override has finished successfully
logging.info("Override file has been updated")

# end
In the overrides command example, the Python script depends on the backoff library. To make sure the library is installed before executing the Python script, the DAST_API_PRE_SCRIPT is set to a script that will install the dependencies of your overrides command.
As for example, the following script user-pre-scan-set-up.sh
#!/bin/bash

# user-pre-scan-set-up.sh
# Ensures python dependencies are installed

echo "**** install python dependencies ****"

python3 -m ensurepip
pip3 install --no-cache --upgrade \
    pip \
    backoff

echo "**** python dependencies installed ****"

# end
You have to update your configuration to set the DAST_API_PRE_SCRIPT to our new user-pre-scan-set-up.sh script. For example:
stages:
  - dast

include:
  - template: DAST-API.gitlab-ci.yml

variables:
  DAST_API_PROFILE: Quick
  DAST_API_OPENAPI: test-api-specification.json
  DAST_API_TARGET_URL: http://test-deployment/
  DAST_API_PRE_SCRIPT: user-pre-scan-set-up.sh
  DAST_API_OVERRIDES_FILE: dast-api-overrides.json
  DAST_API_OVERRIDES_CMD: renew_token.py
  DAST_API_OVERRIDES_INTERVAL: 300
In the previous sample, you could use the script user-pre-scan-set-up.sh to also install new runtimes or applications that later on you could use in our overrides command.
Exclude Paths
Introduced in GitLab 14.0.
When testing an API it can be useful to exclude certain paths. For example, you might exclude testing of an authentication service or an older version of the API. To exclude paths, use the DAST_API_EXCLUDE_PATHS CI/CD variable . This variable is specified in your .gitlab-ci.yml file. To exclude multiple paths, separate entries using the ; character. In the provided paths you can use a single character wildcard ? and * for a multiple character wildcard.
To verify the paths are excluded, review the Tested Operations and Excluded Operations portion of the job output. You should not see any excluded paths listed under Tested Operations.
2021-05-27 21:51:08 [INF] API Security: --[ Tested Operations ]-------------------------
2021-05-27 21:51:08 [INF] API Security: 201 POST http://target:7777/api/users CREATED
2021-05-27 21:51:08 [INF] API Security: ------------------------------------------------
2021-05-27 21:51:08 [INF] API Security: --[ Excluded Operations ]-----------------------
2021-05-27 21:51:08 [INF] API Security: GET http://target:7777/api/messages
2021-05-27 21:51:08 [INF] API Security: POST http://target:7777/api/messages
2021-05-27 21:51:08 [INF] API Security: ------------------------------------------------
Examples
This example excludes the /auth resource. This does not exclude child resources (/auth/child).
variables:
  DAST_API_EXCLUDE_PATHS=/auth
To exclude /auth, and child resources (/auth/child), we use a wildcard.
variables:
  DAST_API_EXCLUDE_PATHS=/auth*
To exclude multiple paths we use the ; character. In this example we exclude /auth* and /v1/*.
variables:
  DAST_API_EXCLUDE_PATHS=/auth*;/v1/*
Exclude parameters
Introduced in GitLab 14.10.
While testing an API you may might want to exclude a parameter (query string, header, or body element) from testing. This may be needed because a parameter always causes a failure, slows down testing, or for other reasons. To exclude parameters, you can set one of the following variables: DAST_API_EXCLUDE_PARAMETER_ENV or DAST_API_EXCLUDE_PARAMETER_FILE.
The DAST_API_EXCLUDE_PARAMETER_ENV allows providing a JSON string containing excluded parameters. This is a good option if the JSON is short and will not often change. Another option is the variable DAST_API_EXCLUDE_PARAMETER_FILE. This variable is set to a file path that can be checked into the repository, created by another job as an artifact, or generated at runtime with a pre script using DAST_API_PRE_SCRIPT.
Exclude parameters using a JSON document
The JSON document contains a JSON object, this object uses specific properties to identify which parameter should be excluded. You can provide the following properties to exclude specific parameters during the scanning process:
-
headers: Use this property to exclude specific headers. The property's value is an array of header names to be excluded. Names are case-insensitive. -
cookies: Use this property's value to exclude specific cookies. The property's value is an array of cookie names to be excluded. Names are case-sensitive. -
query: Use this property to exclude specific fields from the query string. The property's value is an array of field names from the query string to be excluded. Names are case-sensitive. -
body-form: Use this property to exclude specific fields from a request that uses the media typeapplication/x-www-form-urlencoded. The property's value is an array of the field names from the body to be excluded. Names are case-sensitive. -
body-json: Use this property to exclude specific JSON nodes from a request that uses the media typeapplication/json. The property's value is an array, each entry of the array is a JSON Path expression. -
body-xml: Use this property to exclude specific XML nodes from a request that uses media typeapplication/xml. The property's value is an array, each entry of the array is a XPath v2 expression.
Thus, the following JSON document is an example of the expected structure to exclude parameters.
{
  "headers": [
    "header1",
    "header2"
  ],
  "cookies": [
    "cookie1",
    "cookie2"
  ],
  "query": [
    "query-string1",
    "query-string2"
  ],
  "body-form": [
    "form-param1",
    "form-param2"
  ],
  "body-json": [
    "json-path-expression-1",
    "json-path-expression-2"
  ],
  "body-xml" : [
    "xpath-expression-1",
    "xpath-expression-2"
  ]
}
Examples
Excluding a single header
To exclude the header Upgrade-Insecure-Requests, set the header property's value to an array with the header name: [ "Upgrade-Insecure-Requests" ]. For instance, the JSON document looks like this:
{
  "headers": [ "Upgrade-Insecure-Requests" ]
}
Header names are case-insensitive, so the header name UPGRADE-INSECURE-REQUESTS is equivalent to Upgrade-Insecure-Requests.
Excluding both a header and two cookies
To exclude the header Authorization, and the cookies PHPSESSID and csrftoken, set the headers property's value to an array with header name [ "Authorization" ] and the cookies property's value to an array with the cookies' names [ "PHPSESSID", "csrftoken" ]. For instance, the JSON document looks like this:
{
  "headers": [ "Authorization" ],
  "cookies": [ "PHPSESSID", "csrftoken" ]
}
Excluding a body-form parameter
To exclude the password field in a request that uses application/x-www-form-urlencoded, set the body-form property's value to an array with the field name [ "password" ]. For instance, the JSON document looks like this:
{
  "body-form":  [ "password" ]
}
The exclude parameters uses body-form when the request uses a content type application/x-www-form-urlencoded.
Excluding a specific JSON nodes using JSON Path
To exclude the schema property in the root object, set the body-json property's value to an array with the JSON Path expression [ "$.schema" ].
The JSON Path expression uses special syntax to identify JSON nodes: $ refers to the root of the JSON document, . refers to the current object (in our case the root object), and the text schema refers to a property name. Thus, the JSON path expression $.schema refers to a property schema in the root object.
For instance, the JSON document looks like this:
{
  "body-json": [ "$.schema" ]
}
The exclude parameters uses body-json when the request uses a content type application/json. Each entry in body-json is expected to be a JSON Path expression. In JSON Path characters like $, *, . among others have special meaning.
Excluding multiple JSON nodes using JSON Path
To exclude the property password on each entry of an array of users at the root level, set the body-json property's value to an array with the JSON Path expression [ "$.users[*].paswword" ].
The JSON Path expression starts with $ to refer to the root node and uses . to refer to the current node. Then, it uses users to refer to a property and the characters [ and ] to enclose the index in the array you want to use, instead of providing a number as an index you use * to specify any index. After the index reference, we find . which now refers to any given selected index in the array, preceded by a property name password.
For instance, the JSON document looks like this:
{
  "body-json": [ "$.users[*].paswword" ]
}
The exclude parameters uses body-json when the request uses a content type application/json. Each entry in body-json is expected to be a JSON Path expression. In JSON Path characters like $, *, . among others have special meaning.
Excluding a XML attribute
To exclude an attribute named isEnabled located in the root element credentials, set the body-xml property's value to an array with the XPath expression [ "/credentials/@isEnabled" ].
The XPath expression /credentials/@isEnabled, starts with / to indicate the root of the XML document, then it is followed by the word credentials which indicates the name of the element to match. It uses a / to refer to a node of the previous XML element, and the character @ to indicate that the name isEnable is an attribute.
For instance, the JSON document looks like this:
{
  "body-xml": [
    "/credentials/@isEnabled"
  ]
}
The exclude parameters uses body-xml when the request uses a content type application/xml. Each entry in body-xml is expected to be a XPath v2 expression. In XPath expressions characters like @, /, :, [, ] among others have special meanings.
Excluding a XML text's element
To exclude the text of the username element contained in root node credentials, set the body-xml property's value to an array with the XPath expression [/credentials/username/text()" ].
In the XPath expression /credentials/username/text(), the first character / refers to the root XML node, and then after it indicates an XML element's name credentials. Similarly, the character / refers to the current element, followed by a new XML element's name username. Last part has a / that refers to the current element, and uses a XPath function called text() which identifies the text of the current element.
For instance, the JSON document looks like this:
{
  "body-xml": [
    "/credentials/username/text()"
  ]
}
The exclude parameters uses body-xml when the request uses a content type application/xml. Each entry in body-xml is expected to be a XPath v2 expression. In XPath expressions characters like @, /, :, [, ] among others have special meanings.
Excluding an XML element
To exclude the element username contained in root node credentials, set the body-xml property's value to an array with the XPath expression [/credentials/username" ].
In the XPath expression /credentials/username, the first character / refers to the root XML node, and then after it indicates an XML element's name credentials. Similarly, the character / refers to the current element, followed by a new XML element's name username.
For instance, the JSON document looks like this:
{
  "body-xml": [
    "/credentials/username"
  ]
}
The exclude parameters uses body-xml when the request uses a content type application/xml. Each entry in body-xml is expected to be a XPath v2 expression. In XPath expressions characters like @, /, :, [, ] among others have special meanings.
Excluding an XML node with namespaces
To exclude anXML element login which is defined in namespace s, and contained in credentials root node, set the body-xml property's value to an array with the XPath expression [ "/credentials/s:login" ].
In the XPath expression /credentials/s:login, the first character / refers to the root XML node, and then after it indicates an XML element's name credentials. Similarly, the character / refers to the current element, followed by a new XML element's name s:login. Notice that name contains the character :, this character separates the namespace from the node name.
The namespace name should have been defined in the XML document which is part of the body request. You may check the namespace in the specification document HAR, OpenAPI, or Postman Collection file.
{
  "body-xml": [
    "/credentials/s:login"
  ]
}
The exclude parameters uses body-xml when the request uses a content type application/xml. Each entry in body-xml is expected to be an XPath v2 expression. In XPath, expressions characters like @, /, :, [, ] among others have special meanings.
Using a JSON string
To provide the exclusion JSON document set the variable DAST_API_EXCLUDE_PARAMETER_ENV with the JSON string. In the following example, the .gitlab-ci.yml, the DAST_API_EXCLUDE_PARAMETER_ENV variable is set to a JSON string:
stages:
  - dast

include:
  - template: DAST-API.gitlab-ci.yml

variables:
  DAST_API_PROFILE: Quick
  DAST_API_OPENAPI: test-api-specification.json
  DAST_API_TARGET_URL: http://test-deployment/
  DAST_API_EXCLUDE_PARAMETER_ENV: '{ "headers": [ "Upgrade-Insecure-Requests" ] }'
Using a file
To provide the exclusion JSON document set the variable DAST_API_EXCLUDE_PARAMETER_FILE with the JSON file path. The file path is relative to the job current working directory. In the following example .gitlab-ci.yml content, the DAST_API_EXCLUDE_PARAMETER_FILE variable is set to a JSON file path:
stages:
  - dast

include:
  - template: DAST-API.gitlab-ci.yml

variables:
  DAST_API_PROFILE: Quick
  DAST_API_OPENAPI: test-api-specification.json
  DAST_API_TARGET_URL: http://test-deployment/
  DAST_API_EXCLUDE_PARAMETER_FILE: dast-api-exclude-parameters.json
The dast-api-exclude-parameters.json is a JSON document that follows the structure of exclude parameters document.
Exclude URLS
Introduced in GitLab 14.10.
As an alternative to excluding by paths, you can filter by any other component in the URL by using the DAST_API_EXCLUDE_URLS CI/CD variable. This variable can be set in your .gitlab-ci.yml file. The variable can store multiple values, separated by commas (,). Each value is a regular expression. Because each entry is a regular expression, an entry like .* will exclude all URLs because it is a regular expression that matches everything.
In your job output you can check if any URLs matched any provided regular expression from DAST_API_EXCLUDE_URLS. Matching operations are listed in the Excluded Operations section. Operations listed in the Excluded Operations should not be listed in the Tested Operations section. For example the following portion of a job output:
2021-05-27 21:51:08 [INF] API Security: --[ Tested Operations ]-------------------------
2021-05-27 21:51:08 [INF] API Security: 201 POST http://target:7777/api/users CREATED
2021-05-27 21:51:08 [INF] API Security: ------------------------------------------------
2021-05-27 21:51:08 [INF] API Security: --[ Excluded Operations ]-----------------------
2021-05-27 21:51:08 [INF] API Security: GET http://target:7777/api/messages
2021-05-27 21:51:08 [INF] API Security: POST http://target:7777/api/messages
2021-05-27 21:51:08 [INF] API Security: ------------------------------------------------
NOTE:
Each value in DAST_API_EXCLUDE_URLS is a regular expression. Characters such as . , * and $ among many others have special meanings in regular expressions.
Examples
Excluding a URL and child resources
The following example excludes the URL http://target/api/auth and its child resources.
variables:
  DAST_API_EXCLUDE_URLS: http://target/api/auth
Excluding two URLs and allow their child resources
To exclude the URLs http://target/api/buy and http://target/api/sell but allowing to scan their child resources, for instance: http://target/api/buy/toy or http://target/api/sell/chair. You could use the value http://target/api/buy/$,http://target/api/sell/$. This value is using two regular expressions, each of them separated by a , character. Hence, it contains http://target/api/buy$ and http://target/api/sell$. In each regular expression, the trailing $ character points out where the matching URL should end.
variables:
  DAST_API_EXCLUDE_URLS: http://target/api/buy/$,http://target/api/sell/$
Excluding two URLs and their child resources
In order to exclude the URLs: http://target/api/buy and http://target/api/sell, and their child resources. To provide multiple URLs we use the , character as follows:
variables:
  DAST_API_EXCLUDE_URLS: http://target/api/buy,http://target/api/sell
Excluding URL using regular expressions
In order to exclude exactly https://target/api/v1/user/create and https://target/api/v2/user/create or any other version (v3,v4, and more). We could use https://target/api/v.*/user/create$, in the previous regular expression . indicates any character and * indicates zero or more times, additionally $ indicates that the URL should end there.
variables:
  DAST_API_EXCLUDE_URLS: https://target/api/v.*/user/create$
Running your first scan
When configured correctly, a CI/CD pipeline contains a dast stage and an dast_api job. The job only fails when an invalid configuration is provided. During normal operation, the job always succeeds even if vulnerabilities are identified during testing.
Vulnerabilities are displayed on the Security pipeline tab with the suite name. When testing against the repositories default branch, the DAST API vulnerabilities are also shown on the Security & Compliance's Vulnerability Report page.
To prevent an excessive number of reported vulnerabilities, the DAST API scanner limits the number of vulnerabilities it reports per operation.
Viewing DAST API vulnerabilities
The DAST API analyzer produces a JSON report that is collected and used to populate the vulnerabilities into GitLab vulnerability screens.
See handling false positives for information about configuration changes you can make to limit the number of false positives reported.
View details of a DAST API vulnerability
Follow these steps to view details of a vulnerability:
-
You can view vulnerabilities in a project, or a merge request:
- In a project, go to the project's {shield} Security & Compliance > Vulnerability Report page. This page shows all vulnerabilities from the default branch only.
- In a merge request, go the merge request's Security section and click the Expand button. DAST API vulnerabilities are available in a section labeled DAST detected N potential vulnerabilities. Click the title to display the vulnerability details.
-
Click the vulnerabilities title to display the details. The table below describes these details.
Field Description Description Description of the vulnerability including what was modified. Project Namespace and project in which the vulnerability was detected. Method HTTP method used to detect the vulnerability. URL URL at which the vulnerability was detected. Request The HTTP request that caused the vulnerability. Unmodified Response Response from an unmodified request. This is what a normal working response looks like. Actual Response Response received from test request. Evidence How we determined a vulnerability occurred. Identifiers The DAST API check used to find this vulnerability. Severity Severity of the vulnerability. Scanner Type Scanner used to perform testing.
Security Dashboard
The Security Dashboard is a good place to get an overview of all the security vulnerabilities in your groups, projects and pipelines. For more information, see the Security Dashboard documentation.
Interacting with the vulnerabilities
Once a vulnerability is found, you can interact with it. Read more on how to address the vulnerabilities.
Handling False Positives
False positives can be handled in several ways:
- Dismiss the vulnerability.
- Some checks have several methods of detecting when a vulnerability is identified, called Assertions. Assertions can also be turned off and configured. For example, the DAST API scanner by default uses HTTP status codes to help identify when something is a real issue. If an API returns a 500 error during testing, this creates a vulnerability. This isn't always desired, as some frameworks return 500 errors often.
- Turn off the Check producing the false positive. This prevents the check from generating any vulnerabilities. Example checks are the SQL Injection Check, and JSON Hijacking Check.
Turn off a Check
Checks perform testing of a specific type and can be turned on and off for specific configuration
profiles. The provided configuration files define several profiles that you
can use. The profile definition in the configuration file lists all the checks that are active
during a scan. To turn off a specific check, remove it from the profile definition in the
configuration file. The profiles are defined in the Profiles section of the configuration file.
Example profile definition:
Profiles:
  - Name: Quick
    DefaultProfile: Empty
    Routes:
      - Route: *Route0
        Checks:
          - Name: ApplicationInformationCheck
          - Name: CleartextAuthenticationCheck
          - Name: FrameworkDebugModeCheck
          - Name: HtmlInjectionCheck
          - Name: InsecureHttpMethodsCheck
          - Name: JsonHijackingCheck
          - Name: JsonInjectionCheck
          - Name: SensitiveInformationCheck
          - Name: SessionCookieCheck
          - Name: SqlInjectionCheck
          - Name: TokenCheck
          - Name: XmlInjectionCheck
To turn off the JSON Hijacking Check you can remove these lines:
- Name: JsonHijackingCheckThis results in the following YAML:
- Name: Quick
  DefaultProfile: Empty
  Routes:
    - Route: *Route0
      Checks:
        - Name: ApplicationInformationCheck
        - Name: CleartextAuthenticationCheck
        - Name: FrameworkDebugModeCheck
        - Name: HtmlInjectionCheck
        - Name: InsecureHttpMethodsCheck
        - Name: JsonInjectionCheck
        - Name: SensitiveInformationCheck
        - Name: SessionCookieCheck
        - Name: SqlInjectionCheck
        - Name: TokenCheck
        - Name: XmlInjectionCheck
Turn off an Assertion for a Check
Assertions detect vulnerabilities in tests produced by checks. Many checks support multiple Assertions such as Log Analysis, Response Analysis, and Status Code. When a vulnerability is found, the Assertion used is provided. To identify which Assertions are on by default, see the Checks default configuration in the configuration file. The section is called Checks.
This example shows the SQL Injection Check:
- Name: SqlInjectionCheck
  Configuration:
    UserInjections: []
  Assertions:
    - Name: LogAnalysisAssertion
    - Name: ResponseAnalysisAssertion
    - Name: StatusCodeAssertion
Here you can see three Assertions are on by default. A common source of false positives is
StatusCodeAssertion. To turn it off, modify its configuration in the Profiles section. This
example provides only the other two Assertions (LogAnalysisAssertion,
ResponseAnalysisAssertion). This prevents SqlInjectionCheck from using StatusCodeAssertion:
Profiles:
  - Name: Quick
    DefaultProfile: Empty
    Routes:
      - Route: *Route0
        Checks:
          - Name: ApplicationInformationCheck
          - Name: CleartextAuthenticationCheck
          - Name: FrameworkDebugModeCheck
          - Name: HtmlInjectionCheck
          - Name: InsecureHttpMethodsCheck
          - Name: JsonHijackingCheck
          - Name: JsonInjectionCheck
          - Name: SensitiveInformationCheck
          - Name: SessionCookieCheck
          - Name: SqlInjectionCheck
            Assertions:
              - Name: LogAnalysisAssertion
              - Name: ResponseAnalysisAssertion
          - Name: TokenCheck
          - Name: XmlInjectionCheck
Running DAST API in an offline environment
For self-managed GitLab instances in an environment with limited, restricted, or intermittent access to external resources through the internet, some adjustments are required for the DAST API testing job to successfully run.
Steps:
- Host the Docker image in a local container registry.
- Set the
SECURE_ANALYZERS_PREFIXto the local container registry.
The Docker image for DAST API must be pulled (downloaded) from the public registry and then pushed (imported) into a local registry. The GitLab container registry can be used to locally host the Docker image. This process can be performed using a special template. See loading Docker images onto your offline host for instructions.
Once the Docker image is hosted locally, the SECURE_ANALYZERS_PREFIX variable is set with the location of the local registry. The variable must be set such that concatenating /api-fuzzing:1 results in a valid image location.
NOTE:
DAST API and API Fuzzing both use the same underlying Docker image api-fuzzing:1.
For example, the below line sets a registry for the image registry.gitlab.com/gitlab-org/security-products/analyzers/api-fuzzing:1:
SECURE_ANALYZERS_PREFIX: "registry.gitlab.com/gitlab-org/security-products/analyzers"
NOTE:
Setting SECURE_ANALYZERS_PREFIX changes the Docker image registry location for all GitLab Secure templates.
For more information, see Offline environments.
Troubleshooting
Error waiting for API Security 'http://127.0.0.1:5000' to become available
A bug exists in versions of the DAST API analyzer prior to v1.6.196 that can cause a background process to fail under certain conditions. The solution is to update to a newer version of the DAST API analyzer.
The version information can be found in the job details for the dast_api job.
If the issue is occurring with versions v1.6.196 or greater, please contact Support and provide the following information:
- Reference this troubleshooting section and ask for the issue to be escalated to the Dynamic Analysis Team.
- The full console output of the job.
- The
gl-api-security-scanner.logfile available as a job artifact. In the right-hand panel of the job details page, select the Browse button. - The
dast_apijob definition from your.gitlab-ci.ymlfile.
Failed to start scanner session (version header not found)
The DAST API engine outputs an error message when it cannot establish a connection with the scanner application component. The error message is shown in the job output window of the dast_api job. A common cause of this issue is changing the DAST_API_API variable from its default.
Error message
- In GitLab 13.11 and later,
Failed to start scanner session (version header not found). - In GitLab 13.10 and earlier,
API Security version header not found. Are you sure that you are connecting to the API Security server?.
Solution
- Remove the
DAST_API_APIvariable from the.gitlab-ci.ymlfile. The value will be inherited from the DAST API CI/CD template. We recommend this method instead of manually setting a value. - If removing the variable is not possible, check to see if this value has changed in the latest version of the DAST API CI/CD template. If so, update the value in the
.gitlab-ci.ymlfile.
Application cannot determine the base URL for the target API
The DAST API engine outputs an error message when it cannot determine the target API after inspecting the OpenAPI document. This error message is shown when the target API has not been set in the .gitlab-ci.yml file, it is not available in the environment_url.txt file, and it could not be computed using the OpenAPI document.
There is a order of precedence in which the DAST API engine tries to get the target API when checking the different sources. First, it will try to use the DAST_API_TARGET_URL. If the environment variable has not been set, then the DAST API engine will attempt to use the environment_url.txt file. If there is no file environment_url.txt, then the DAST API engine will use the OpenAPI document contents and the URL provided in DAST_API_OPENAPI (if a URL is provided) to try to compute the target API.
The best-suited solution will depend on whether or not your target API changes for each deployment. In static environments, the target API is the same for each deployment, in this case please refer to the static environment solution. If the target API changes for each deployment a dynamic environment solution should be applied.
Static environment solution
This solution is for pipelines in which the target API URL doesn't change (is static).
Add environmental variable
For environments where the target API remains the same, we recommend you specify the target URL by using the DAST_API_TARGET_URL environment variable. In your .gitlab-ci.yml, add a variable DAST_API_TARGET_URL. The variable must be set to the base URL of API testing target. For example:
include:
    - template: DAST-API.gitlab-ci.yml

  variables:
    DAST_API_TARGET_URL: http://test-deployment/
    DAST_API_OPENAPI: test-api-specification.json
Dynamic environment solutions
In a dynamic environment your target API changes for each different deployment. In this case, there is more than one possible solution, we recommend you use the environment_url.txt file when dealing with dynamic environments.
Use environment_url.txt
To support dynamic environments in which the target API URL changes during each pipeline, DAST API engine supports the use of an environment_url.txt file that contains the URL to use. This file is not checked into the repository, instead it's created during the pipeline by the job that deploys the test target and collected as an artifact that can be used by later jobs in the pipeline. The job that creates the environment_url.txt file must run before the DAST API engine job.
- Modify the test target deployment job adding the base URL in an
environment_url.txtfile at the root of your project. - Modify the test target deployment job collecting the
environment_url.txtas an artifact.
Example:
deploy-test-target:
  script:
    # Perform deployment steps
    # Create environment_url.txt (example)
    - echo http://${CI_PROJECT_ID}-${CI_ENVIRONMENT_SLUG}.example.org > environment_url.txt

  artifacts:
    paths:
      - environment_url.txt
Use OpenAPI with an invalid schema
There are cases where the document is autogenerated with an invalid schema or cannot be edited manually in a timely manner. In those scenarios, the API Security is able to perform a relaxed validation by setting the variable DAST_API_OPENAPI_RELAXED_VALIDATION. We recommend providing a fully compliant OpenAPI document to prevent unexpected behaviors.
Edit a non-compliant OpenAPI file
To detect and correct elements that don't comply with the OpenAPI specifications, we recommend using an editor. An editor commonly provides document validation, and suggestions to create a schema-compliant OpenAPI document. Suggested editors include:
| Editor | OpenAPI 2.0 | OpenAPI 3.0.x | OpenAPI 3.1.x |
|---|---|---|---|
| Swagger Editor | {check-circle} YAML, JSON | {check-circle} YAML, JSON | {dotted-circle} YAML, JSON |
| Stoplight Studio | {check-circle} YAML, JSON | {check-circle} YAML, JSON | {check-circle} YAML, JSON |
If your OpenAPI document is generated manually, load your document in the editor and fix anything that is non-compliant. If your document is generated automatically, load it in your editor to identify the issues in the schema, then go to the application and perform the corrections based on the framework you are using.
Enable OpenAPI relaxed validation
Relaxed validation is meant for cases when the OpenAPI document cannot meet OpenAPI specifications, but it still has enough content to be consumed by different tools. A validation is performed but less strictly in regards to document schema.
API Security can still try to consume an OpenAPI document that does not fully comply with OpenAPI specifications. To instruct API Security to perform a relaxed validation, set the variable DAST_API_OPENAPI_RELAXED_VALIDATION to any value, for example:
   stages:
     - dast

   include:
     - template: DAST-API.gitlab-ci.yml

   variables:
     DAST_API_PROFILE: Quick
     DAST_API_TARGET_URL: http://test-deployment/
     DAST_API_OPENAPI: test-api-specification.json
     DAST_API_OPENAPI_RELAXED_VALIDATION: On
No operation in the OpenAPI document is consuming any supported media type
API Security uses the specified media types in the OpenAPI document to generate requests. If no request can be created due to the lack of supported media types, then an error will be thrown.
Error message
- In GitLab 14.10 and later,
Error, no operation in the OpenApi document is consuming any supported media type. Check 'OpenAPI Specification' to check the supported media types.
Solution
- Review supported media types in the OpenAPI Specification section.
- Edit your OpenAPI document, allowing at least a given operation to accept any of the supported media types. Alternatively, a supported media type could be set in the OpenAPI document level and get applied to all operations. This step may require changes in your application to ensure the supported media type is accepted by the application.
Get support or request an improvement
To get support for your particular problem please use the getting help channels.
The GitLab issue tracker on GitLab.com is the right place for bugs and feature proposals about API Security and DAST API.
Please use ~"Category:API Security" label when opening a new issue regarding DAST API to ensure it is quickly reviewed by the right people. Please refer to our review response SLO to understand when you should receive a response.
Search the issue tracker for similar entries before submitting your own, there's a good chance somebody else had the same issue or feature proposal. Show your support with an award emoji and or join the discussion.
When experiencing a behavior not working as expected, consider providing contextual information:
- GitLab version if using a self-managed instance.
-
.gitlab-ci.ymljob definition. - Full job console output.
- Scanner log file available as a job artifact named
gl-api-security-scanner.log.
WARNING: Sanitize data attached to a support issue. Please remove sensitive information, including: credentials, passwords, tokens, keys, and secrets.
Glossary
- Assert: Assertions are detection modules used by checks to trigger a vulnerability. Many assertions have configurations. A check can use multiple Assertions. For example, Log Analysis, Response Analysis, and Status Code are common Assertions used together by checks. Checks with multiple Assertions allow them to be turned on and off.
- Check: Performs a specific type of test, or performed a check for a type of vulnerability. For example, the SQL Injection Check performs DAST testing for SQL Injection vulnerabilities. The DAST API scanner is comprised of several checks. Checks can be turned on and off in a profile.
- Profile: A configuration file has one or more testing profiles, or sub-configurations. You may have a profile for feature branches and another with extra testing for a main branch.