Content:
What is ASYST?
ASYST is a program designed to support teachers as they grade free-text answers in tests: With the help of Artificial Intelligence,
ASYST makes grade suggestions that can be reviewed and, if necessary, modified by the teachers.
ASYST is intended for the evaluation of short answers that are one to three sentences in long. It is not intended to be used for longer responses.
ASYST helps the teacher by suggesting a grade. This assessment may well be incorrect in individual cases; the teacher can check and correct it.
This saves time in two ways compared to completely manual grading: First, reviewing grades is generally faster than grading from scratch;
and second, we recommend reviewing mostly those ASYST grades that are most prone to errors (see Section How do I continue with the output from ASYST? ).
The program is written in Python; the source code is publicly available. To make ASYST easier to use, the Python scripts have been
converted into an executable that is usable in Windows 11.
The technical background and development history of ASYST are described in Pado, Eryilmaz and Kirschner, IJAIED 2023 along with a worked example for German data. For English data, a similar example is available in Pado, AIED 2022
Which languages are supported by ASYST?
ASYST has been tested for German and English.
The language model that covers German can in principle handle other languages, as well. So, in principle, you could select "German" as language setting and upload data in one of the other languages covered by the model. If you try this, please check the results carefully, as this is untested! (According to the model developers, the covered languages are: ar, bg, ca, cs, da, de, el, en, es, et, fa, fi, fr, fr-ca, gl, gu, he, hi, hr, hu, hy, id, it, ja, ka, ko, ku, lt, lv, mk, mn, mr, ms, my, nb, nl, pl, pt, pt-br, ro, ru, sk, sl, sq, sr, sv, th, tr, uk, ur, vi, zh-cn, zh-tw.)
How do I use ASYST?
We developed ASYST to be as user-friendly as possible.
What does the input look like?
The program works based on your data in Excel's .xlsx format (which can also be generated by Libre Office Calc and other programs). This is an example table:

The following information needs to be included in the **correct order** and with the **correct column headings**:
1) **question**: The question that was asked
2) **referenceAnswer**: A correct answer / reference answer
3) **studentAnswer**: The student answer that is to be evaluated
5) (optional) **observed grade**: The grade given by the teacher can be entered here in order to evaluate the accuracy of the ASYST predictions.
The example table can be found at DE_Demo_Daten.xlsx. It contains some questions and answers from the CSSAG corpus (Computer Science Short Answers in German) of HFT Stuttgart. The corpus is licensed as CC-BY-NC.
How do I run ASYST on Windows 11?
First, download _ASYST.exe_ .
The program can be started by double-clicking its icon.
The program will take a while to start (approx. 1 minute). During this time the system is initialized.
**Note**: Windows Defender may warn against running the application because the program does not have a security certificate.
By selecting _more information_ and then _Run anyway_ the error message disappears and ASYST can be executed. ASYST's source code is open source so you can verify the code is not malicious.

 After the program has been started, a window appears. First, select the language of the answers to be evaluated.
The table to be processed can then be selected by clicking on the “Input File” field. The data should be arranged as described above.
After clicking on the “Start” field, ASYST begins processing the data. Again, this can take a while (1-2 minutes, relatively independent of the amount of data being processed).
Once the program has processed all answers and made predictions, a table view headed "Results" opens.
The results table contains all columns of the input table, as well as the grades suggested by ASYST -- see the the "predicted grade" column. The grades for answers classified as incorrect are highlighted in red. You cannot make change in this table. Instead, save the data by clicking on “Save as” and then open the resulting .xlsx file with a spreadsheet program.

As soon as the result table is displayed, ASYST can read and process the next input table.
**ATTENTION: The results table is not saved automatically.**
Therefore, to save the results, the **"Save as"** button should be clicked and the output table should be saved at the desired location.
After the program has been started, a window appears. First, select the language of the answers to be evaluated.
The table to be processed can then be selected by clicking on the “Input File” field. The data should be arranged as described above.
After clicking on the “Start” field, ASYST begins processing the data. Again, this can take a while (1-2 minutes, relatively independent of the amount of data being processed).
Once the program has processed all answers and made predictions, a table view headed "Results" opens.
The results table contains all columns of the input table, as well as the grades suggested by ASYST -- see the the "predicted grade" column. The grades for answers classified as incorrect are highlighted in red. You cannot make change in this table. Instead, save the data by clicking on “Save as” and then open the resulting .xlsx file with a spreadsheet program.

As soon as the result table is displayed, ASYST can read and process the next input table.
**ATTENTION: The results table is not saved automatically.**
Therefore, to save the results, the **"Save as"** button should be clicked and the output table should be saved at the desired location.
How do I continue with the output from ASYST?
We recommend the following **process** when using ASYST:
(Further information and a concrete example of the procedure can be found in _Assessing the Practical Benefit of Automated Short-Answer Graders_.)
1) **Define requirements**: How accurate does the grading need to be in my current use case?
- When evaluating free text questions in low-stakes test situations (not in a final exam or similar), human grades differ in around 15% of cases!
- In such situations, we therefore recommend aiming for a grading accuracy of at least 85% after using ASYST plus human review.
- The distribution of grading errors (excessive strictness/leniency) should also be taken into account
- Ultimately, using the tool should save users time: set the available time budget or a minimum requirement for time saved.
2) **Collect** manually evaluated **test data:**
To get an idea of the accuracy and reliability of the automated grader, annotated test data is needed.
This is input data for which a grade has already been determined. This can be answers from previous tests, for example.
To make the data set as robust as possible against random fluctuations, it should ideally contain a few hundred responses -- but smaller data sets can of course also be used.
4) **Analyze** the performance of the automated grading
The manually graded test data can be used to measure how reliable and accurate the automated grader is for the test data. This will give you an idea of how well the grade prediction works for your own data set.
For this purpose, process the questions and answers from the test data set using ASYST and compare the grade predictions with the manual assessment (e.g. in a spreadsheet such as Excel or Libre Office Calc).
The proportion of correctly classified answers in the entire data set gives you the system accuracy (which should be at around 85% or higher, which means disagreement between the manual and machine grades of 15% or less).
You can also calculate the precision for each grade ("correct"/"incorrect"). Precision measures how many predictions of a given grade were actually correct, i.e. how trustworthy the ASYST's predictions are for a given label. A precision of 75% for the rating "correct" means that three quarters of all predictions of "correct" were in fact right, but for a quarter of the cases the answer was actually wrong according to the manual grades.
_(We plan to add functionality to automatically generate these reliability parameters in the future.)_
5) **Decide** how to use ASYST's predictions.
A usage decision can now be made based on the reliability parameters collected for the criteria mentioned above.
- How large is the proportion of correctly predicted reviews? If it is >85%, you can even adopt the ASYST predictions unchanged if you wish.
- What is the precision of the grade labels ("correct"/"incorrect")? If one of the grade labels is likely to be significantly more reliable, you can decide to accept these predictions without review and only check the predictions for the less reliable grade predictions. In practice, this leads to significant time savings.
- How is the grading error distributed? Are correct answers frequently predicted to be incorrect, or vice versa? Is this acceptable for your situation?
- How much evaluation effort would you have saved for the example data set, e.g. by accepting the more reliable grade label without review?
How can I run ASYST if I don't use Windows 11?
The clickable application “ASYST.exe” is only suitable for running on Windows 11.
On other operating systems, ASYST can be run from a development environment.
The ASYST source code is written in Python and can therefore be robustly executed in various development environments.
For users who are not familiar with running Python programs, one option is described in more detail below.
Running ASYST in the Pycharm development environment
- If you haven't already done so, the Pycharm development environment from the Internet
Download and install.
For more information and troubleshooting see
Pycharm installation guide.
- Install Python
ASYST was developed in Python 3.10 - therefore this version is recommended for execution.
The version that matches the operating system can be selected and installed at https://www.python.org/downloads.
- Download the source code from Gitlab to the development environment:
Get from VCS
 Enter the following path in the _url_ field: git@transfer.hft-stuttgart.de:ulrike.pado/ASYST.git
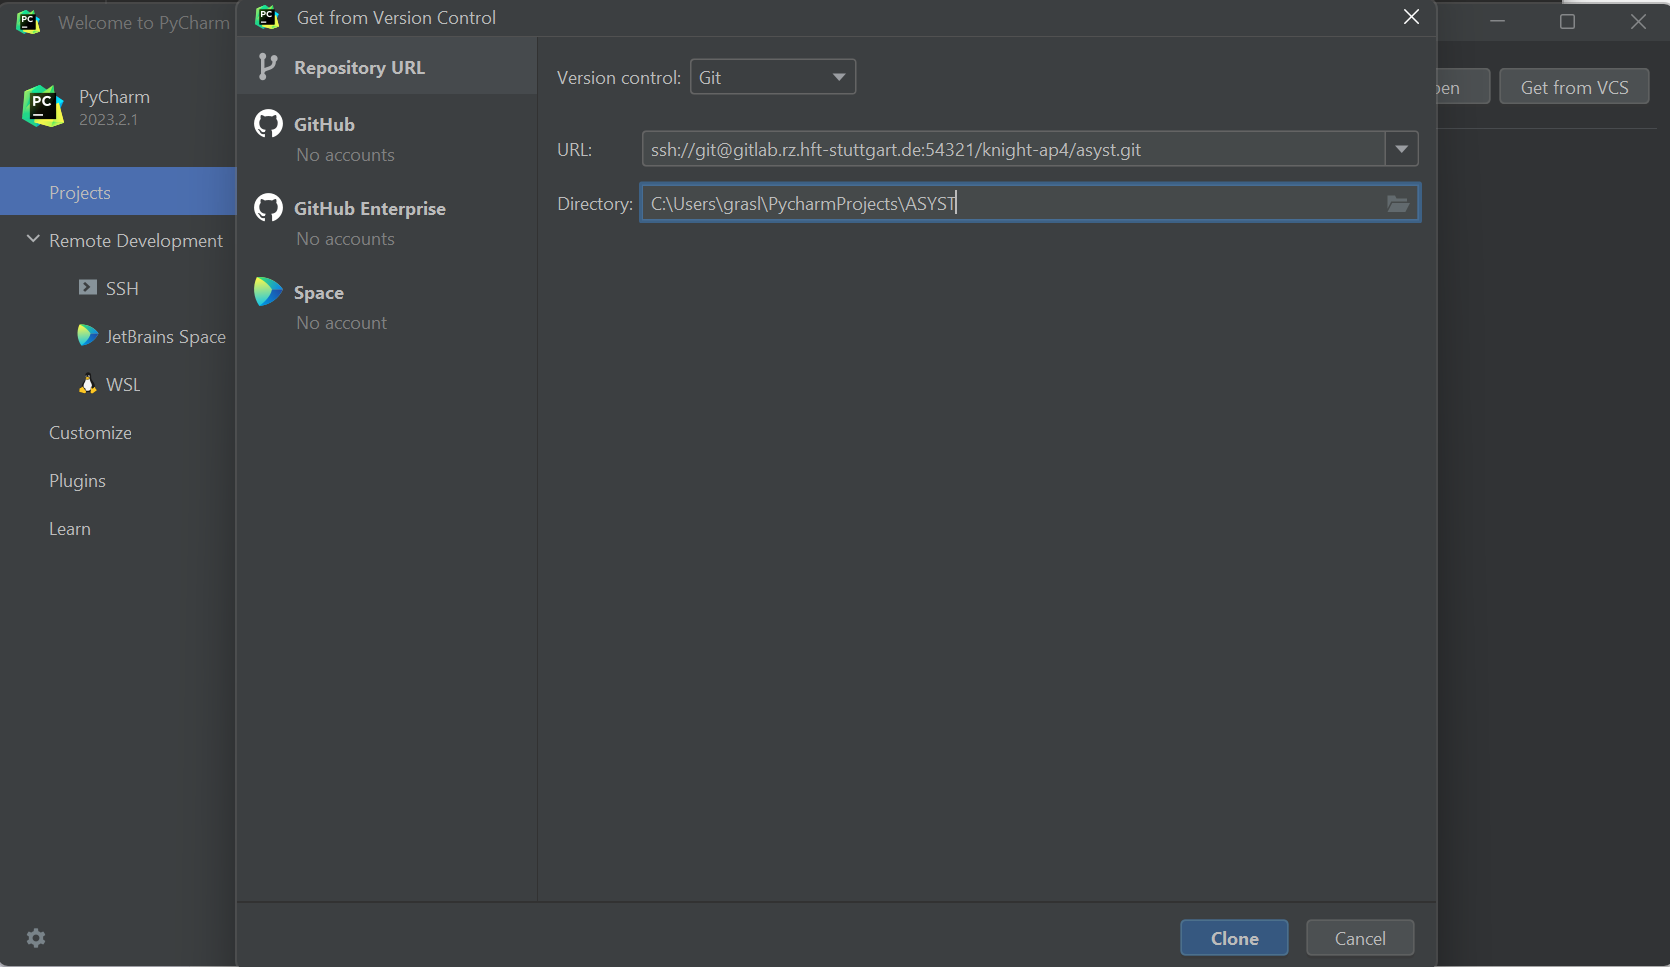 Then click on _clone_ and wait
- Configure development environment
**Configure Python interpreter:**
Navigate to _Settings >> Project ASYST >> Python Interpreter >> Add Interpreter >> Add local Interpreter_


_Location_: [Project Path]/[Project Name]/Source,
_Base interpreter_: Path to the installed Python version
*Install required packages:*
If Pycharm does not itself suggest installing the packages listed in the requirements.txt,
manually run the following commands in the PyCharm terminal:
'''
> cd Source
>
>
> pip install -r requirements.txt
'''
- Run ASYST

After the file _main.py_ has been selected via the project directory on the left, the greyed out _Start button_ at the top right of the window will appear green. A single click is enough to execute the ASYST code.