Configure Gitaly (FREE SELF)
The Gitaly service itself is configured by using a TOML configuration file.
To change Gitaly settings:
For Omnibus GitLab
- Edit
/etc/gitlab/gitlab.rband add or change the Gitaly settings. - Save the file and reconfigure GitLab.
For installations from source
- Edit
/home/git/gitaly/config.tomland add or change the Gitaly settings. - Save the file and restart GitLab.
The following configuration options are also available:
- Enabling TLS support.
- Configuring the number of
gitaly-rubyworkers. - Limiting RPC concurrency.
About the Gitaly token
The token referred to throughout the Gitaly documentation is just an arbitrary password selected by the administrator. It is unrelated to tokens created for the GitLab API or other similar web API tokens.
Run Gitaly on its own server
By default, Gitaly is run on the same server as Gitaly clients and is configured as above. Single-server installations are best served by this default configuration used by:
- Omnibus GitLab.
- The GitLab source installation guide.
However, Gitaly can be deployed to its own server, which can benefit GitLab installations that span multiple machines.
NOTE: When configured to run on their own servers, Gitaly servers must be upgraded before Gitaly clients in your cluster.
The process for setting up Gitaly on its own server is:
- Install Gitaly.
- Configure authentication.
- Configure Gitaly servers.
- Configure Gitaly clients.
- Disable Gitaly where not required (optional).
When running Gitaly on its own server, note the following regarding GitLab versions:
- From GitLab 11.4, Gitaly was able to serve all Git requests without requiring a shared NFS mount for Git repository data, except for the Elasticsearch indexer.
- From GitLab 11.8, the Elasticsearch indexer also uses Gitaly for data access. NFS can still be leveraged for redundancy on block-level Git data, but should be mounted only on the Gitaly servers.
- From GitLab 11.8 to 12.2, it is possible to use Elasticsearch in a Gitaly setup that doesn't use NFS. To use Elasticsearch in these versions, the repository indexer must be enabled in your GitLab configuration.
- In GitLab 12.3 and later, the new indexer is the default and no configuration is required.
Network architecture
The following list depicts the network architecture of Gitaly:
- GitLab Rails shards repositories into repository storages.
-
/config/gitlab.ymlcontains a map from storage names to(Gitaly address, Gitaly token)pairs. - The
storage name->(Gitaly address, Gitaly token)map in/config/gitlab.ymlis the single source of truth for the Gitaly network topology. - A
(Gitaly address, Gitaly token)corresponds to a Gitaly server. - A Gitaly server hosts one or more storages.
- A Gitaly client can use one or more Gitaly servers.
- Gitaly addresses must be specified in such a way that they resolve correctly for all Gitaly clients.
- Gitaly clients are:
- Puma.
- Sidekiq.
- GitLab Workhorse.
- GitLab Shell.
- Elasticsearch indexer.
- Gitaly itself.
- A Gitaly server must be able to make RPC calls to itself by using its own
(Gitaly address, Gitaly token)pair as specified in/config/gitlab.yml. - Authentication is done through a static token which is shared among the Gitaly and GitLab Rails nodes.
The following digraph illustrates communication between Gitaly servers and GitLab Rails showing the default ports for HTTP and HTTPs communication.
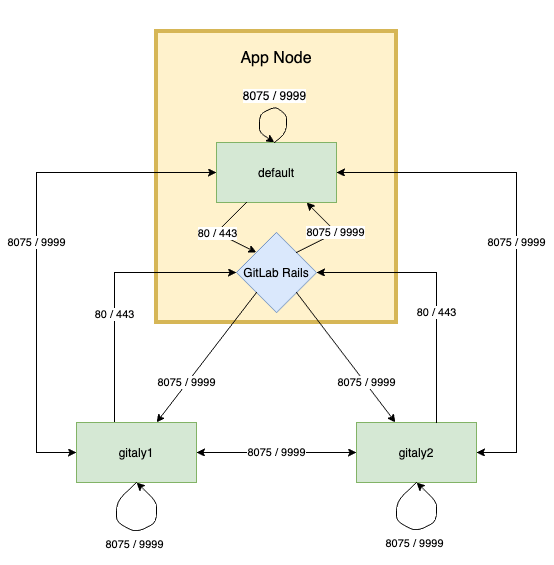
WARNING: Gitaly servers must not be exposed to the public internet as Gitaly's network traffic is unencrypted by default. The use of firewall is highly recommended to restrict access to the Gitaly server. Another option is to use TLS.
In the following sections, we describe how to configure two Gitaly servers with secret token
abc123secret:
-
gitaly1.internal. -
gitaly2.internal.
We assume your GitLab installation has three repository storages:
-
default. -
storage1. -
storage2.
You can use as few as one server with one repository storage if desired.
Install Gitaly
Install Gitaly on each Gitaly server using either Omnibus GitLab or install it from source:
- For Omnibus GitLab, download and install the Omnibus GitLab
package you want but do not provide the
EXTERNAL_URL=value. - To install from source, follow the steps at Install Gitaly.
Configure authentication
Gitaly and GitLab use two shared secrets for authentication:
- One to authenticate gRPC requests to Gitaly.
- A second for authentication callbacks from GitLab Shell to the GitLab internal API.
For Omnibus GitLab
To configure the Gitaly token:
-
On the Gitaly clients, edit
/etc/gitlab/gitlab.rb:gitlab_rails['gitaly_token'] = 'abc123secret' -
Save the file and reconfigure GitLab.
-
On the Gitaly server, edit
/etc/gitlab/gitlab.rb:gitaly['auth_token'] = 'abc123secret'
There are two ways to configure the GitLab Shell token.
Method 1:
- Copy
/etc/gitlab/gitlab-secrets.jsonfrom the Gitaly client to same path on the Gitaly servers (and any other Gitaly clients). - Reconfigure GitLab on Gitaly servers.
Method 2:
-
On the Gitaly clients, edit
/etc/gitlab/gitlab.rb:gitlab_shell['secret_token'] = 'shellsecret' -
Save the file and reconfigure GitLab.
-
On the Gitaly servers, edit
/etc/gitlab/gitlab.rb:gitlab_shell['secret_token'] = 'shellsecret'
For installations from source
-
Copy
/home/git/gitlab/.gitlab_shell_secretfrom the Gitaly client to the same path on the Gitaly servers (and any other Gitaly clients). -
On the Gitaly clients, edit
/home/git/gitlab/config/gitlab.yml:gitlab: gitaly: token: 'abc123secret' -
Save the file and restart GitLab.
-
On the Gitaly servers, edit
/home/git/gitaly/config.toml:[auth] token = 'abc123secret' -
Save the file and restart GitLab.
Configure Gitaly servers
On the Gitaly servers, you must configure storage paths and enable the network listener. The Gitaly server must be able to read, write, and set permissions on the configured path.
If you want to reduce the risk of downtime when you enable authentication, you can temporarily disable enforcement. For more information, see the documentation on configuring Gitaly authentication.
For Omnibus GitLab
-
Edit
/etc/gitlab/gitlab.rb:# Avoid running unnecessary services on the Gitaly server postgresql['enable'] = false redis['enable'] = false nginx['enable'] = false puma['enable'] = false sidekiq['enable'] = false gitlab_workhorse['enable'] = false grafana['enable'] = false gitlab_exporter['enable'] = false # If you run a separate monitoring node you can disable these services alertmanager['enable'] = false prometheus['enable'] = false # If you don't run a separate monitoring node you can # enable Prometheus access & disable these extra services. # This makes Prometheus listen on all interfaces. You must use firewalls to restrict access to this address/port. # prometheus['listen_address'] = '0.0.0.0:9090' # prometheus['monitor_kubernetes'] = false # If you don't want to run monitoring services uncomment the following (not recommended) # node_exporter['enable'] = false # Prevent database connections during 'gitlab-ctl reconfigure' gitlab_rails['auto_migrate'] = false # Configure the gitlab-shell API callback URL. Without this, `git push` will # fail. This can be your 'front door' GitLab URL or an internal load # balancer. # Don't forget to copy `/etc/gitlab/gitlab-secrets.json` from Gitaly client to Gitaly server. gitlab_rails['internal_api_url'] = 'https://gitlab.example.com' # Authentication token to ensure only authorized servers can communicate with # Gitaly server gitaly['auth_token'] = 'AUTH_TOKEN' # Make Gitaly accept connections on all network interfaces. You must use # firewalls to restrict access to this address/port. # Comment out following line if you only want to support TLS connections gitaly['listen_addr'] = "0.0.0.0:8075" -
Append the following to
/etc/gitlab/gitlab.rbfor each respective Gitaly server:On
gitaly1.internal:git_data_dirs({ 'default' => { 'path' => '/var/opt/gitlab/git-data' }, 'storage1' => { 'path' => '/mnt/gitlab/git-data' }, })On
gitaly2.internal:git_data_dirs({ 'storage2' => { 'path' => '/srv/gitlab/git-data' }, }) -
Save the file and reconfigure GitLab.
-
Run
sudo /opt/gitlab/embedded/bin/gitaly-hooks check /var/opt/gitlab/gitaly/config.tomlto confirm that Gitaly can perform callbacks to the GitLab internal API.
For installations from source
-
Edit
/home/git/gitaly/config.toml:listen_addr = '0.0.0.0:8075' runtime_dir = '/var/opt/gitlab/gitaly' [logging] format = 'json' level = 'info' dir = '/var/log/gitaly'For GitLab 14.9 and earlier, set
internal_socket_dir = '/var/opt/gitlab/gitaly'instead ofruntime_dir. -
Append the following to
/home/git/gitaly/config.tomlfor each respective Gitaly server:On
gitaly1.internal:[[storage]] name = 'default' path = '/var/opt/gitlab/git-data/repositories' [[storage]] name = 'storage1' path = '/mnt/gitlab/git-data/repositories'On
gitaly2.internal:[[storage]] name = 'storage2' path = '/srv/gitlab/git-data/repositories' -
Edit
/home/git/gitlab-shell/config.yml:gitlab_url: https://gitlab.example.com -
Save the files and restart GitLab.
-
Run
sudo -u git /home/git/gitaly/gitaly-hooks check /home/git/gitaly/config.tomlto confirm that Gitaly can perform callbacks to the GitLab internal API.
WARNING:
If directly copying repository data from a GitLab server to Gitaly, ensure that the metadata file,
default path /var/opt/gitlab/git-data/repositories/.gitaly-metadata, is not included in the transfer.
Copying this file causes GitLab to use the Rugged patches for repositories hosted on the Gitaly server,
leading to Error creating pipeline and Commit not found errors, or stale data.
Configure Gitaly clients
As the final step, you must update Gitaly clients to switch from using local Gitaly service to use the Gitaly servers you just configured.
NOTE:
GitLab requires a default repository storage to be configured.
Read more about this limitation.
This can be risky because anything that prevents your Gitaly clients from reaching the Gitaly servers causes all Gitaly requests to fail. For example, any sort of network, firewall, or name resolution problems.
Additionally, you must disable Rugged if previously enabled manually.
Gitaly makes the following assumptions:
- Your
gitaly1.internalGitaly server can be reached atgitaly1.internal:8075from your Gitaly clients, and that Gitaly server can read, write, and set permissions on/var/opt/gitlab/git-dataand/mnt/gitlab/git-data. - Your
gitaly2.internalGitaly server can be reached atgitaly2.internal:8075from your Gitaly clients, and that Gitaly server can read, write, and set permissions on/srv/gitlab/git-data. - Your
gitaly1.internalandgitaly2.internalGitaly servers can reach each other.
You can't define Gitaly servers with some as a local Gitaly server
(without gitaly_address) and some as remote
server (with gitaly_address) unless you use
mixed configuration.
For Omnibus GitLab
-
Edit
/etc/gitlab/gitlab.rb:# Use the same token value configured on all Gitaly servers gitlab_rails['gitaly_token'] = '<AUTH_TOKEN>' git_data_dirs({ 'default' => { 'gitaly_address' => 'tcp://gitaly1.internal:8075' }, 'storage1' => { 'gitaly_address' => 'tcp://gitaly1.internal:8075' }, 'storage2' => { 'gitaly_address' => 'tcp://gitaly2.internal:8075' }, })Alternatively, if each Gitaly server is configured to use a different authentication token:
git_data_dirs({ 'default' => { 'gitaly_address' => 'tcp://gitaly1.internal:8075', 'gitaly_token' => '<AUTH_TOKEN_1>' }, 'storage1' => { 'gitaly_address' => 'tcp://gitaly1.internal:8075', 'gitaly_token' => '<AUTH_TOKEN_1>' }, 'storage2' => { 'gitaly_address' => 'tcp://gitaly2.internal:8075', 'gitaly_token' => '<AUTH_TOKEN_2>' }, }) -
Save the file and reconfigure GitLab.
-
Run
sudo gitlab-rake gitlab:gitaly:checkon the Gitaly client (for example, the Rails application) to confirm it can connect to Gitaly servers. -
Tail the logs to see the requests:
sudo gitlab-ctl tail gitaly
For installations from source
-
Edit
/home/git/gitlab/config/gitlab.yml:gitlab: repositories: storages: default: gitaly_address: tcp://gitaly1.internal:8075 gitaly_token: AUTH_TOKEN_1 path: /some/local/path storage1: gitaly_address: tcp://gitaly1.internal:8075 gitaly_token: AUTH_TOKEN_1 path: /some/local/path storage2: gitaly_address: tcp://gitaly2.internal:8075 gitaly_token: AUTH_TOKEN_2 path: /some/local/pathNOTE:
/some/local/pathshould be set to a local folder that exists, however no data is stored in this folder. This requirement is scheduled to be removed when this issue is resolved. -
Save the file and restart GitLab.
-
Run
sudo -u git -H bundle exec rake gitlab:gitaly:check RAILS_ENV=productionto confirm the Gitaly client can connect to Gitaly servers. -
Tail the logs to see the requests:
tail -f /home/git/gitlab/log/gitaly.log
When you tail the Gitaly logs on your Gitaly server, you should see requests coming in. One sure way to trigger a Gitaly request is to clone a repository from GitLab over HTTP or HTTPS.
WARNING: If you have server hooks configured, either per repository or globally, you must move these to the Gitaly servers. If you have multiple Gitaly servers, copy your server hooks to all Gitaly servers.
Mixed configuration
GitLab can reside on the same server as one of many Gitaly servers, but doesn't support configuration that mixes local and remote configuration. The following setup is incorrect, because:
- All addresses must be reachable from the other Gitaly servers.
-
storage1is assigned a Unix socket forgitaly_addresswhich is invalid for some of the Gitaly servers.
git_data_dirs({
  'default' => { 'gitaly_address' => 'tcp://gitaly1.internal:8075' },
  'storage1' => { 'path' => '/mnt/gitlab/git-data' },
  'storage2' => { 'gitaly_address' => 'tcp://gitaly2.internal:8075' },
})
To combine local and remote Gitaly servers, use an external address for the local Gitaly server. For example:
git_data_dirs({
  'default' => { 'gitaly_address' => 'tcp://gitaly1.internal:8075' },
  # Address of the GitLab server that also has Gitaly running on it
  'storage1' => { 'gitaly_address' => 'tcp://gitlab.internal:8075', 'path' => '/mnt/gitlab/git-data' },
  'storage2' => { 'gitaly_address' => 'tcp://gitaly2.internal:8075' },
})

# Make Gitaly accept connections on all network interfaces
gitaly['listen_addr'] = "0.0.0.0:8075"

# Or for TLS
gitaly['tls_listen_addr'] = "0.0.0.0:9999"
gitaly['certificate_path'] = "/etc/gitlab/ssl/cert.pem"
gitaly['key_path'] = "/etc/gitlab/ssl/key.pem"
path can be included only for storage shards on the local Gitaly server.
If it's excluded, default Git storage directory is used for that storage shard.
GitLab requires a default repository storage
When adding Gitaly servers to an environment, you might want to replace the original default Gitaly service. However, you can't
reconfigure the GitLab application servers to remove the default entry from git_data_dirs because GitLab requires a
git_data_dirs entry called default. Read more about this limitation.
To work around the limitation:
- Define an additional storage location on the new Gitaly service and configure the additional storage to be
default. - In the Admin Area, set
defaultto a weight of zero to prevent repositories being stored there.
Disable Gitaly where not required (optional)
If you run Gitaly as a remote service, consider disabling the local Gitaly service that runs on your GitLab server by default, and run it only where required.
Disabling Gitaly on the GitLab instance makes sense only when you run GitLab in a custom cluster configuration, where Gitaly runs on a separate machine from the GitLab instance. Disabling Gitaly on all machines in the cluster is not a valid configuration (some machines much act as Gitaly servers).
To disable Gitaly on a GitLab server:
For Omnibus GitLab
-
Edit
/etc/gitlab/gitlab.rb:gitaly['enable'] = false -
Save the file and reconfigure GitLab.
For installations from source
-
Edit
/etc/default/gitlab:gitaly_enabled=false -
Save the file and restart GitLab.
Enable TLS support
- Introduced in GitLab 11.8.
- Introduced in GitLab 13.6, outgoing TLS connections to GitLab provide client certificates if configured.
Gitaly supports TLS encryption. To communicate with a Gitaly instance that listens for secure
connections, use the tls:// URL scheme in the gitaly_address of the corresponding
storage entry in the GitLab configuration.
Gitaly provides the same server certificates as client certificates in TLS connections to GitLab. This can be used as part of a mutual TLS authentication strategy when combined with reverse proxies (for example, NGINX) that validate client certificate to grant access to GitLab.
You must supply your own certificates as this isn't provided automatically. The certificate corresponding to each Gitaly server must be installed on that Gitaly server.
Additionally, the certificate (or its certificate authority) must be installed on all:
- Gitaly servers.
- Gitaly clients that communicate with it.
Note the following:
- The certificate must specify the address you use to access the Gitaly server. You must add the hostname or IP address as a Subject Alternative Name to the certificate.
- You can configure Gitaly servers with both an unencrypted listening address
listen_addrand an encrypted listening addresstls_listen_addrat the same time. This allows you to gradually transition from unencrypted to encrypted traffic if necessary.
To configure Gitaly with TLS:
For Omnibus GitLab
-
Create certificates for Gitaly servers.
-
On the Gitaly clients, copy the certificates (or their certificate authority) into
/etc/gitlab/trusted-certs:sudo cp cert.pem /etc/gitlab/trusted-certs/ -
On the Gitaly clients, edit
git_data_dirsin/etc/gitlab/gitlab.rbas follows:git_data_dirs({ 'default' => { 'gitaly_address' => 'tls://gitaly1.internal:9999' }, 'storage1' => { 'gitaly_address' => 'tls://gitaly1.internal:9999' }, 'storage2' => { 'gitaly_address' => 'tls://gitaly2.internal:9999' }, }) -
Save the file and reconfigure GitLab.
-
On the Gitaly servers, create the
/etc/gitlab/ssldirectory and copy your key and certificate there:sudo mkdir -p /etc/gitlab/ssl sudo chmod 755 /etc/gitlab/ssl sudo cp key.pem cert.pem /etc/gitlab/ssl/ sudo chmod 644 key.pem cert.pem -
Copy all Gitaly server certificates (or their certificate authority) to
/etc/gitlab/trusted-certson all Gitaly servers and clients so that Gitaly servers and clients trust the certificate when calling into themselves or other Gitaly servers:sudo cp cert1.pem cert2.pem /etc/gitlab/trusted-certs/ -
Edit
/etc/gitlab/gitlab.rband add:gitaly['tls_listen_addr'] = "0.0.0.0:9999" gitaly['certificate_path'] = "/etc/gitlab/ssl/cert.pem" gitaly['key_path'] = "/etc/gitlab/ssl/key.pem" -
Save the file and reconfigure GitLab.
-
Verify Gitaly traffic is being served over TLS by observing the types of Gitaly connections.
-
Optional. Improve security by:
- Disabling non-TLS connections by commenting out or deleting
gitaly['listen_addr']in/etc/gitlab/gitlab.rb. - Saving the file.
- Reconfiguring GitLab.
- Disabling non-TLS connections by commenting out or deleting
For installations from source
-
Create certificates for Gitaly servers.
-
On the Gitaly clients, copy the certificates into the system trusted certificates:
sudo cp cert.pem /usr/local/share/ca-certificates/gitaly.crt sudo update-ca-certificates -
On the Gitaly clients, edit
storagesin/home/git/gitlab/config/gitlab.ymlas follows:gitlab: repositories: storages: default: gitaly_address: tls://gitaly1.internal:9999 path: /some/local/path storage1: gitaly_address: tls://gitaly1.internal:9999 path: /some/local/path storage2: gitaly_address: tls://gitaly2.internal:9999 path: /some/local/pathNOTE:
/some/local/pathshould be set to a local folder that exists, however no data is stored in this folder. This requirement is scheduled to be removed when Gitaly issue #1282 is resolved. -
Save the file and restart GitLab.
-
On the Gitaly servers, create or edit
/etc/default/gitlaband add:export SSL_CERT_DIR=/etc/gitlab/ssl -
On the Gitaly servers, create the
/etc/gitlab/ssldirectory and copy your key and certificate there:sudo mkdir -p /etc/gitlab/ssl sudo chmod 755 /etc/gitlab/ssl sudo cp key.pem cert.pem /etc/gitlab/ssl/ sudo chmod 644 key.pem cert.pem -
Copy all Gitaly server certificates (or their certificate authority) to the system trusted certificates folder so Gitaly server trusts the certificate when calling into itself or other Gitaly servers.
sudo cp cert.pem /usr/local/share/ca-certificates/gitaly.crt sudo update-ca-certificates -
Edit
/home/git/gitaly/config.tomland add:tls_listen_addr = '0.0.0.0:9999' [tls] certificate_path = '/etc/gitlab/ssl/cert.pem' key_path = '/etc/gitlab/ssl/key.pem' -
Save the file and restart GitLab.
-
Verify Gitaly traffic is being served over TLS by observing the types of Gitaly connections.
-
Optional. Improve security by:
- Disabling non-TLS connections by commenting out or deleting
listen_addrin/home/git/gitaly/config.toml. - Saving the file.
- Restarting GitLab.
- Disabling non-TLS connections by commenting out or deleting
Observe type of Gitaly connections
For information on observing the type of Gitaly connections being served, see the relevant documentation.
gitaly-ruby
Gitaly was developed to replace the Ruby application code in GitLab.
To save time and avoid the risk of rewriting existing application logic, we chose to copy some application code from GitLab into Gitaly.
To be able to run that code, gitaly-ruby was created, which is a "sidecar" process for the main
Gitaly Go process. Some examples of things that are implemented in gitaly-ruby are:
- RPCs that deal with wikis.
- RPCs that create commits on behalf of a user, such as merge commits.
We recommend:
- At least 300 MB memory per worker.
- No more than one worker per core.
NOTE:
gitaly-ruby is planned to be eventually removed. To track progress, see the
Remove the Gitaly-Ruby sidecar epic.
Configure number of gitaly-ruby workers
gitaly-ruby has much less capacity than Gitaly implemented in Go. If your Gitaly server has to handle lots of
requests, the default setting of having just one active gitaly-ruby sidecar might not be enough.
If you see ResourceExhausted errors from Gitaly, it's very likely that you have not enough
gitaly-ruby capacity.
You can increase the number of gitaly-ruby processes on your Gitaly server with the following
settings:
For Omnibus GitLab
-
Edit
/etc/gitlab/gitlab.rb:# Default is 2 workers. The minimum is 2; 1 worker is always reserved as # a passive stand-by. gitaly['ruby_num_workers'] = 4 -
Save the file, and then reconfigure GitLab.
For installations from source
-
Edit
/home/git/gitaly/config.toml:[gitaly-ruby] num_workers = 4 -
Save the file and restart GitLab.
Limit RPC concurrency
Clone traffic can put a large strain on your Gitaly service. The bulk of the work gets done in the either of the following RPCs:
-
SSHUploadPack(for Git SSH). -
PostUploadPack(for Git HTTP).
To prevent such workloads from overwhelming your Gitaly server, you can set concurrency limits in Gitaly's configuration file. For example:
# in /etc/gitlab/gitlab.rb

gitaly['concurrency'] = [
  {
    'rpc' => "/gitaly.SmartHTTPService/PostUploadPack",
    'max_per_repo' => 20
  },
  {
    'rpc' => "/gitaly.SSHService/SSHUploadPack",
    'max_per_repo' => 20
  }
]
This limits the number of in-flight RPC calls for the given RPCs. The limit is applied per repository. In the example above:
- Each repository served by the Gitaly server can have at most 20 simultaneous
PostUploadPackRPC calls in flight, and the same forSSHUploadPack. - If another request comes in for a repository that has used up its 20 slots, that request gets queued.
You can observe the behavior of this queue using the Gitaly logs and Prometheus. For more information, see the relevant documentation.
Background Repository Optimization
Empty directories and unneeded configuration settings may accumulate in a repository and slow down Git operations. Gitaly can schedule a daily background task with a maximum duration to clean up these items and improve performance.
WARNING: This is an experimental feature and may place significant load on the host while running. Make sure to schedule this during off-peak hours and keep the duration short (for example, 30-60 minutes).
For Omnibus GitLab
Edit /etc/gitlab/gitlab.rb and add:
gitaly['daily_maintenance_start_hour'] = 4
gitaly['daily_maintenance_start_minute'] = 30
gitaly['daily_maintenance_duration'] = '30m'
gitaly['daily_maintenance_storages'] = ["default"]
For installations from source
Edit /home/git/gitaly/config.toml and add:
[daily_maintenance]
start_hour = 4
start_minute = 30
duration = '30m'
storages = ["default"]
Rotate Gitaly authentication token
Rotating credentials in a production environment often requires downtime, causes outages, or both.
However, you can rotate Gitaly credentials without a service interruption. Rotating a Gitaly authentication token involves:
- Verifying authentication monitoring.
- Enabling "auth transitioning" mode.
- Updating Gitaly authentication tokens.
- Ensuring there are no authentication failures.
- Disabling "auth transitioning" mode.
- Verifying authentication is enforced.
This procedure also works if you are running GitLab on a single server. In that case, "Gitaly server" and "Gitaly client" refers to the same machine.
Verify authentication monitoring
Before rotating a Gitaly authentication token, verify that you can monitor the authentication behavior of your GitLab installation using Prometheus.
You can then continue the rest of the procedure.
Enable "auth transitioning" mode
Temporarily disable Gitaly authentication on the Gitaly servers by putting them into "auth transitioning" mode as follows:
# in /etc/gitlab/gitlab.rb
gitaly['auth_transitioning'] = true
After you have made this change, your Prometheus query should return something like:
{enforced="false",status="would be ok"} 4424.985419441742Because enforced="false", it is safe to start rolling out the new token.
Update Gitaly authentication token
To update to a new Gitaly authentication token, on each Gitaly client and Gitaly server:
-
Update the configuration:
# in /etc/gitlab/gitlab.rb gitaly['auth_token'] = '<new secret token>' -
Restart Gitaly:
gitlab-ctl restart gitaly
If you run your Prometheus query while this change is
being rolled out, you see non-zero values for the enforced="false",status="denied" counter.
Ensure there are no authentication failures
After the new token is set, and all services involved have been restarted, you will temporarily see a mix of:
-
status="would be ok". -
status="denied".
After the new token is picked up by all Gitaly clients and Gitaly servers, the
only non-zero rate should be enforced="false",status="would be ok".
Disable "auth transitioning" mode
To re-enable Gitaly authentication, disable "auth transitioning" mode. Update the configuration on your Gitaly servers as follows:
# in /etc/gitlab/gitlab.rb
gitaly['auth_transitioning'] = false
WARNING: Without completing this step, you have no Gitaly authentication.
Verify authentication is enforced
Refresh your Prometheus query. You should now see a similar result as you did at the start. For example:
{enforced="true",status="ok"} 4424.985419441742enforced="true" means that authentication is being enforced.
Pack-objects cache (FREE SELF)
- Introduced in GitLab 13.11.
- It's enabled on GitLab.com.
- It's recommended for production use.
Gitaly, the service that provides storage for Git repositories, can be configured to cache a short rolling window of Git fetch responses. This can reduce server load when your server receives lots of CI fetch traffic.
Overview
The pack-objects cache wraps git pack-objects, an internal part of
Git that gets invoked indirectly via the PostUploadPack and
SSHUploadPack Gitaly RPCs. These are the RPCs that Gitaly runs when a
user does a Git fetch via HTTP or SSH, respectively. When the cache is
enabled, anything that uses PostUploadPack or SSHUploadPack can
benefit from it. It is orthogonal to:
- The transport (HTTP or SSH).
- Git protocol version (v0 or v2).
- The type of fetch (full clones, incremental fetches, shallow clones, partial clones, and so on).
The strength of this cache is its ability to deduplicate concurrent identical fetches. It:
- Can benefit GitLab instances where your users run CI/CD pipelines with many concurrent jobs. There should be a noticeable reduction in server CPU utilization.
- Does not benefit unique fetches at all. For example, if you run a spot check by cloning a repository to your local computer, you are unlikely to see a benefit from this cache because your fetch is probably unique.
The pack-objects cache is a local cache. It:
- Stores its metadata in the memory of the Gitaly process it is enabled in.
- Stores the actual Git data it is caching in files on local storage.
Using local files has the benefit that the operating system may automatically keep parts of the pack-objects cache files in RAM, making it faster.
Because the pack-objects cache can lead to a significant increase in disk write IO, it is off by default.
Configure the cache
These are the configuration settings for the pack-objects cache. Each setting is discussed in greater detail below.
| Setting | Default | Description |
|---|---|---|
enabled |
false |
Turns on the cache. When off, Gitaly runs a dedicated git pack-objects process for each request. |
dir |
<PATH TO FIRST STORAGE>/+gitaly/PackObjectsCache |
Local directory where cache files get stored. |
max_age |
5m (5 minutes) |
Cache entries older than this get evicted and removed from disk. |
In /etc/gitlab/gitlab.rb, set:
gitaly['pack_objects_cache_enabled'] = true
## gitaly['pack_objects_cache_dir'] = '/var/opt/gitlab/git-data/repositories/+gitaly/PackObjectsCache'
## gitaly['pack_objects_cache_max_age'] = '5m'
enabled defaults to false
The cache is disabled by default. This is because in some cases, it can create an extreme increase in the number of bytes written to disk. On GitLab.com, we have verified that our repository storage disks can handle this extra workload, but we felt we cannot assume this is true everywhere.
Cache storage directory dir
The cache needs a directory to store its files in. This directory should be:
- In a file system with enough space. If the cache file system runs out of space, all fetches start failing.
- On a disk with enough IO bandwidth. If the cache disk runs out of IO bandwidth, all fetches, and probably the entire server, slows down.
By default, the cache storage directory is set to a subdirectory of the first Gitaly storage defined in the configuration file.
Multiple Gitaly processes can use the same directory for cache storage. Each Gitaly process uses a unique random string as part of the cache filenames it creates. This means:
- They do not collide.
- They do not reuse another process's files.
While the default directory puts the cache files in the same file system as your repository data, this is not requirement. You can put the cache files on a different file system if that works better for your infrastructure.
The amount of IO bandwidth required from the disk depends on:
- The size and shape of the repositories on your Gitaly server.
- The kind of traffic your users generate.
You can use the gitaly_pack_objects_generated_bytes_total metric as a pessimistic estimate,
pretending your cache hit ratio is 0%.
The amount of space required depends on:
- The bytes per second that your users pull from the cache.
- The size of the
max_agecache eviction window.
If your users pull 100 MB/s and you use a 5 minute window, then on average you have
5*60*100MB = 30GB of data in your cache directory. This is an expected average, not
a guarantee. Peak size may exceed this average.
Cache eviction window max_age
The max_age configuration setting lets you control the chance of a
cache hit and the average amount of storage used by cache files.
Entries older than max_age get evicted from the in-memory metadata
store, and deleted from disk.
Eviction does not interfere with ongoing requests, so it is OK
for max_age to be less than the time it takes to do a fetch over a
slow connection. This is because Unix filesystems do not truly delete
a file until all processes that are reading the deleted file have
closed it.
Observe the cache
The cache can be observed using metrics and in the following logged information:
| Message | Fields | Description |
|---|---|---|
generated bytes |
bytes, cache_key
|
Logged when an entry was added to the cache |
served bytes |
bytes, cache_key
|
Logged when an entry was read from the cache |
In the case of a:
- Cache miss, Gitaly logs both a
generated bytesand aserved bytesmessage. - Cache hit, Gitaly logs only a
served bytesmessage.
Example:
{
  "bytes":26186490,
  "cache_key":"1b586a2698ca93c2529962e85cda5eea8f0f2b0036592615718898368b462e19",
  "correlation_id":"01F1MY8JXC3FZN14JBG1H42G9F",
  "grpc.meta.deadline_type":"none",
  "grpc.method":"PackObjectsHook",
  "grpc.request.fullMethod":"/gitaly.HookService/PackObjectsHook",
  "grpc.request.glProjectPath":"root/gitlab-workhorse",
  "grpc.request.glRepository":"project-2",
  "grpc.request.repoPath":"@hashed/d4/73/d4735e3a265e16eee03f59718b9b5d03019c07d8b6c51f90da3a666eec13ab35.git",
  "grpc.request.repoStorage":"default",
  "grpc.request.topLevelGroup":"@hashed",
  "grpc.service":"gitaly.HookService",
  "grpc.start_time":"2021-03-25T14:57:52.747Z",
  "level":"info",
  "msg":"generated bytes",
  "peer.address":"@",
  "pid":20961,
  "span.kind":"server",
  "system":"grpc",
  "time":"2021-03-25T14:57:53.543Z"
}
{
  "bytes":26186490,
  "cache_key":"1b586a2698ca93c2529962e85cda5eea8f0f2b0036592615718898368b462e19",
  "correlation_id":"01F1MY8JXC3FZN14JBG1H42G9F",
  "grpc.meta.deadline_type":"none",
  "grpc.method":"PackObjectsHook",
  "grpc.request.fullMethod":"/gitaly.HookService/PackObjectsHook",
  "grpc.request.glProjectPath":"root/gitlab-workhorse",
  "grpc.request.glRepository":"project-2",
  "grpc.request.repoPath":"@hashed/d4/73/d4735e3a265e16eee03f59718b9b5d03019c07d8b6c51f90da3a666eec13ab35.git",
  "grpc.request.repoStorage":"default",
  "grpc.request.topLevelGroup":"@hashed",
  "grpc.service":"gitaly.HookService",
  "grpc.start_time":"2021-03-25T14:57:52.747Z",
  "level":"info",
  "msg":"served bytes",
  "peer.address":"@",
  "pid":20961,
  "span.kind":"server",
  "system":"grpc",
  "time":"2021-03-25T14:57:53.543Z"
}
Repository consistency checks
Gitaly runs repository consistency checks:
- When triggering a repository check.
- When changes are fetched from a mirrored repository.
- When users push changes into repository.
These consistency checks verify that a repository has all required objects and that these objects are valid objects. They can be categorized as:
- Basic checks that assert that a repository doesn't become corrupt. This includes connectivity checks and checks that objects can be parsed.
- Security checks that recognize objects that are suitable to exploit past security-related bugs in Git.
- Cosmetic checks that verify that all object metadata is valid. Older Git versions and other Git implementations may have produced objects with invalid metadata, but newer versions can interpret these malformed objects.
Removing malformed objects that fail the consistency checks requires a rewrite of the repository's history, which often can't be done. Therefore, Gitaly by default disables consistency checks for a range of cosmetic issues that don't negatively impact repository consistency.
By default, Gitaly doesn't disable basic or security-related checks so to not distribute objects that can trigger known vulnerabilities in Git clients. This also limits the ability to import repositories containing such objects even if the project doesn't have malicious intent.
Override repository consistency checks
Instance administrators can override consistency checks if they must process repositories that do not pass consistency checks.
For Omnibus GitLab installations, edit /etc/gitlab/gitlab.rb and set the
following keys (in this example, to disable the hasDotgit consistency check):
ignored_git_errors = ["hasDotgit = ignore"]
omnibus_gitconfig['system'] = {
        "fsck" => ignored_git_errors,
        "fetch.fsck" => ignored_git_errors,
        "receive.fsck" => ignored_git_errors,
}
For source installs, edit the Gitaly configuration (gitaly.toml) to do the
equivalent:
[[git.config]]
key = "fsck.hasDotgit"
value = "ignore"

[[git.config]]
key = "fetch.fsck.hasDotgit"
value = "ignore"

[[git.config]]
key = "receive.fsck.hasDotgit"
value = "ignore"