-
 Rosanny Sihombing authored98e0620d
How to Implement Parameter Catalogs with Eclipse
To build a new parameter catalog from scratch, we first have to understand some basics about Eclipse, and then install the correct Eclipse package. Thereafter, we can model our data with Ecore considering some best practices, followed by the generation of Java classes and user interface (UI). We, then, will add some plug-ins to "pimp" our Eclipse installation, (a) to enable deployment of parameter catalog applications, and (b) to add units and quantities to the mix. Some hints on special modeling problems and versioning parameter catalogs conclude this how-to guide.
Eclipse Basics
Eclipse was originally developed by IBM and became Open Source in 2001. It is best known for its Integrated Development Environments (Eclipse IDEs), not only for Java, but also for C++, Python and many other programming languages. These IDEs are created on top of the Eclipse Rich Client Platform (Eclipse RCP), an application framework and plug-in system based on Java and OSGi. Eclipse RCP is foundation of a plethora of general-purpose applications, too.
First time users of Eclipse better understand the following concepts.
An Eclipse package is an Eclipse distribution dedicated to a specific type of task.[1] A list of packages is available at eclipse.org. Beside others it contains Eclipse IDE for Java Developers, Eclipse IDE for Scientific Computing, and the package we will use: Eclipse Modeling Tools. Note that third parties offer many other packages, e.g. GAMA for multi-agent-simulation or Obeo Designer Community for creating Sirius diagram editors.
|
Several Eclipse packages can be installed side by side, even different releases of the same package. Multiple Eclipse installations can run at the same time, each on its own workspace (see below). |
An installed Eclipse package consists of a runtime core and a bunch of additional plug-ins. Technically, a plug-in is just a special kind of Java archive (JAR file) that uses and can be used by other plug-ins with regard to OSGi specifications. Groups of plug-ins that belong together are called a feature.
Often, a user will add plug-ins or features to an Eclipse installation to add new capabilities.
E.g. writing this documentation within my Eclipse IDE is facilitated by the plug-in Asciidoctor Editor.
Plug-ins can easily be installed via main menu command Help → Eclipse Marketplace… or Help → Install New Software….
Some plug-ins may be self-made like our plug-in de.hftstuttgart.units that enables Ecore to deal with quantities.
These may be provided via Git or as download and have to be added to an Eclipse installation manually.
Git is the industry standard for collaborative work on, and versioning of, source code and other textual data. Collaborative development of parameter catalogs benefits massively from using Git. Git support is built into Eclipse Modeling Tools, the Eclipse package we will use. However, if Eclipse needs to connect to a Git server that uses SSH protocol (not HTTPS with credentials), access configuration is more involved and may be dependent on your operating system.
Some users, anyway, prefer to use Git from the command line or with one of the client application listed here, e.g. TortoiseGit for Windows.
While it is required to get Git working at some point, we won’t refer to it in this document and, for now, do not cover the installation of Git on your machine or configuration of Git in Eclipse.
When you start a new Eclipse installation for the first time, you are asked to designate a new directory in your file system to store an Eclipse workspace.
Eclipse is always running with exact one workspace open.
As the name implies, a workspace stores everything needed in a given context of work, namely a set of related projects the user is working on as well as meta-data like preference settings, the current status of projects, to do lists, and more.
In case a user wants to work in different contexts, e.g. on different tasks, command File → Switch Workspace allows to create additional workspaces and to switch between them.
|
Any plug-in from the original Eclipse package or installed by the user later will be copied into the Eclipse installation directory, not in any workspace. Configuration and current state of plug-ins, on the other hand, are stored in workspaces. |
An Eclipse project is a technical term for a directory that often contains:
-
files of specific types for source code, scripts, XML files or other data
-
build settings, configurations
-
dependency definitions (remember the dependencies between plug-ins above?)
-
other Eclipse projects.
File → New → Project… offers many different types of projects that the user can choose from, e.g. Java projects to create Java programs, Ecore modeling projects, or general projects, that simple hold some arbitrary files.[2]
|
Files that do not belong to a project are invisible for Eclipse! |
The projects belonging to a workspace can either be directly stored within the workspace as sub-directories (the default offered to the user when creating a new project), or linked from it, that is the workspace just holds a link to the project directory that lives somewhere in the file system outside of the workspace. Linking allows to work with the same projects in different workspaces.
While it sometimes makes sense to share or exchange workspaces between users,[3], I do not recommend this for now.
Projects, in contrast, are shared between users most of the time, usually via Git.
In general, I would suggest to store Eclipse projects outside workspaces at dedicated locations in the user’s file system.
That way, we can follow the convention that local Git repositories should all be located under
<userhome>/git.
Setup Eclipse Modeling Tools
Eclipse runs on 64-bit versions of Windows, Linux, and macOS and requires an according Java Development Kit (JDK), version 11 or higher, to be installed on your machine.
Even if such JDK already exists, please download OpenJDK, version 15 or newer for your operating system from AdoptOpenJDK.
[4]
Choose HotSpot as Java Virtual Machine.
Installation process is straight forward, but you can also find links to exhaustive instructions for your operating system.
New Java versions appear every six months, so one could tend to stick with older version 11 that comes with long time support (LTE) until version 17 arrives in autumn 2021. However, actual version 15 conforms to the latest security measures built into macOS Catalina, so it is a must if software we build here shall be deployed to these systems, too.
Note that different versions of Java coexist peacefully.
Now its time to download and install the correct Eclipse package Eclipse Modeling Tools, version 2020-09 or newer.[5] Please go to Eclipse download page for packages. On this page you may see "Try the Eclipse Installer" or similar. Do not follow this advice, since we want more control over what versions of Java and Eclipse shall be installed. Instead, look for package Eclipse Modeling Tools and follow the link for your operating system on the right:
Finally, you can click on Download and wait for the 400 something MB package to arrive.
|
Depending on the operating system, several security dialogs have to be acknowledged during installation and first launch of Eclipse. |
The downloaded installation file contains the application simply named Eclipse ready to be copied into Applications on macOS or be installed in Programs on Windows.
Since later you may add other Eclipse packages — or different versions of the same package — I suggest to rename the application more significantly to EclipseModeling2009 or similar.
After installation has finished launch Eclipse for the first time and you will see a dialog for choosing a new empty directory as its workspace.

Again, more workspaces might come into existence later, so replace the proposed generic directory path and name with a more specific one, e.g.EclipseModelingWS.
The Eclipse main window appears with a Welcome Screen open.
It contains links to exhaustive documentation on concept, features and usage of Eclipse that might be of interest later, especially:
-
Overview
-
Workbench basics
-
Concepts: features, resources, perspectives, views, editors
-
Opening perspectives and views
-
Installing new software manually
-
-
Team support with Git
-
-
Learn how to use the Ecore diagram editor
-
Launch the Eclipse Marketplace
For now, you can dismiss the welcome screen. It can be opened anytime by executing Help → Welcome.
Now you should see the initial layout of Eclipse with Model Explorer and Outline on the left and a big empty editing area to the right with a Properties view below.
Modeling Parameter Catalogs for Simulation with Ecore
There are two hard problems in computer science: cache invalidation, naming things, and off-by-1 errors.
It takes time and effort to come along with good names for model entities, projects, files, and so on. Also, specific naming conventions are in place to enhance readability of models and program code. Since it is not always clear where names provided during modeling are used later, I compiled a list of names important in Ecore projects and added examples and comments to elucidate their meaning and naming conventions.
| Name | Demo Catalog Example | Real World Expample |
|---|---|---|
Namespace URI |
||
Namespace Prefix |
democat |
buildphys |
Base Package (reverse domain)[6] |
org.example |
hft-stuttgart.de |
Main Package |
democatalog |
buildingphysics |
Eclipse Project[7] |
org.example.democatalog |
de.hft-stuttgart.buildingphysics |
Class Prefix |
Democatalog |
Buildingphysics |
XML File Suffix |
democatalog |
buildingphysics |
Classes |
e.g. SolarPanel |
e.g. WindowType |
Attributes |
e.g. nominalPower |
e.g. id |
Associations |
e.g. solarPanels |
e.g. windowTypes |
Classes are written in Camel case notation starting with an upper case letter. Associations and attributes are written the same way, but starting with a lower case letter.
All other names should be derived from the globally unique name space of the project, in our example: example.org/democatalog.
It consists of a global unique domain name and a path to the project, unique within that domain.
Use the names of example Demo Catalog to create your first Ecore modeling project:
-
Execute
File → New → Ecore Modeling Projectfrom main menu — notModeling Project! -
Name the project
org.example.democatalogand uncheckUse default locationso that the new project is not stored in workspace but a different directory you create/choose, then clickNext > -
Provide
democatalogas main Java package name, uncheckUse default namespace parameterand providehttp://example.org/democatalogas Ns URI anddemocatas Ns prefix -
Click
Finish.
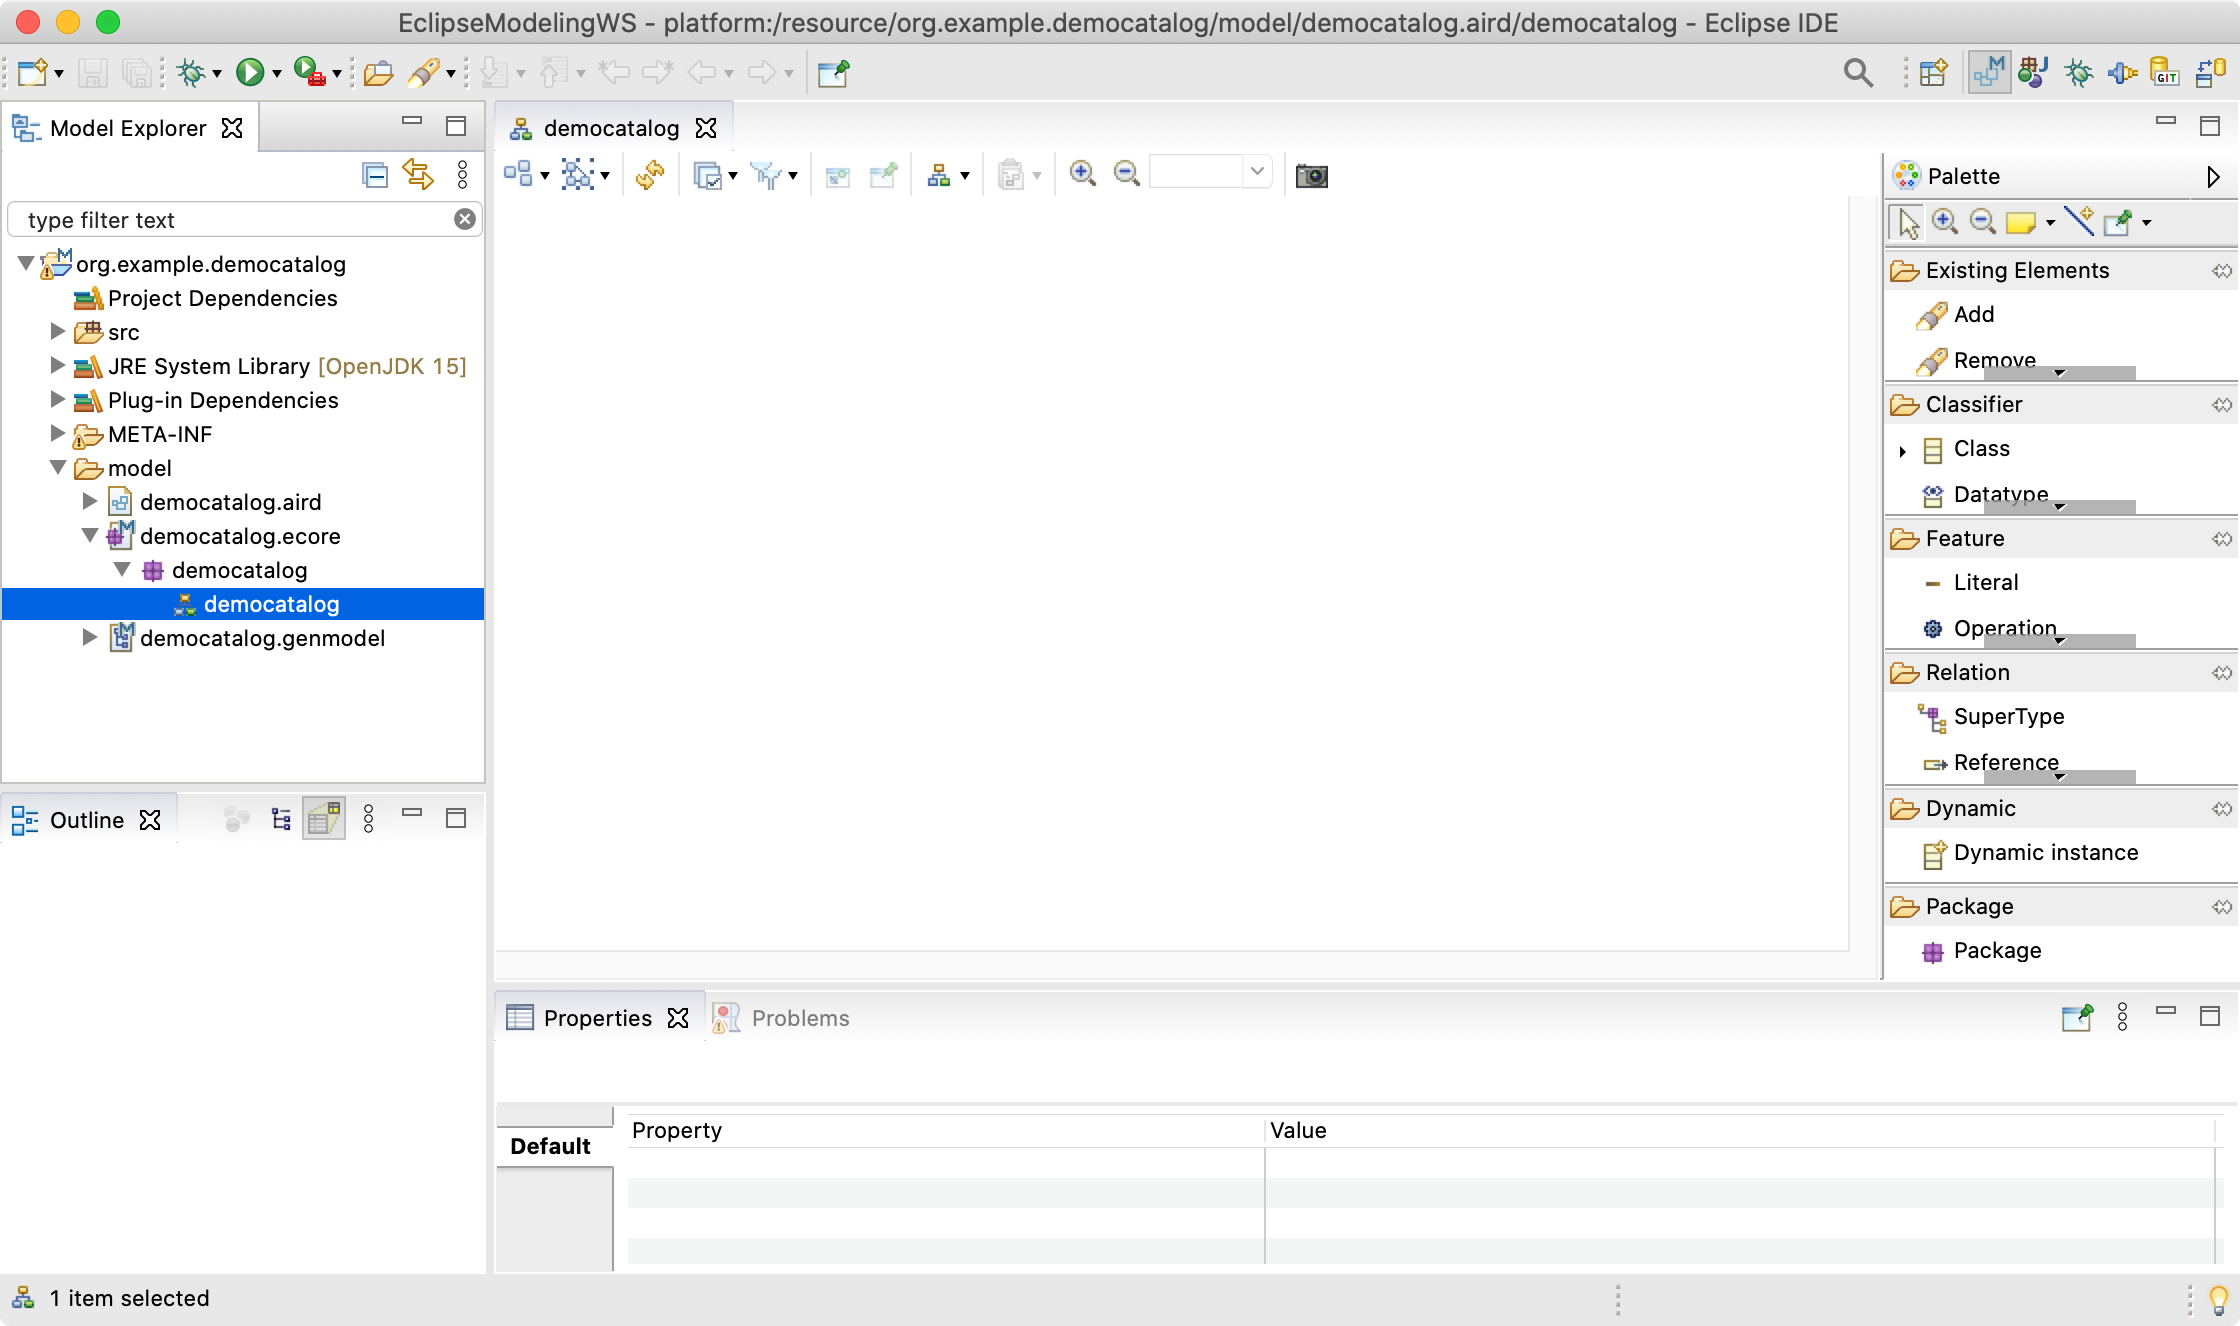
Eclipse should look like below with an new empty graphical Ecore diagram editor opened.
The diagram is automatically named democatalog after the package name for the Java classes that will be generated from it (provided above).
The Model Explorer shows the contents of the new Ecore modeling project.
To get your feet wet, do this:
-
Drag a Class from the palette on the right onto the editor’s canvas: it will materialize as a rectangle labeled
NewEClass1. -
The class symbol should be selected initially, so you can see its attributes in the Properties view.
-
In there replace
NewEClass1byEnergyComponentsCatalogto rename the class. -
Click anywhere on the canvas and notice that the class symbol is deselected and the toolbar at the top adapts accordingly.
-
In the toolbar change
100%to75%to scale diagram. -
Execute
File → Saveto save model and diagram on disk. -
Close diagram editor
democatalogby closing its tab. -
Reopen saved diagram by double click on entry
democatalogin Model Explorer.
Technically, everything is in place now to begin modeling the data that the projected catalog shall contain. Except … understanding the basics of object-oriented modeling would be helpful. This is why developers should support domain experts at this stage.
Ecore diagrams are simplified UML class diagrams. Here some resources on what this is all about:
|
Beginners are strongly encouraged to read the first two resources. The first one contains a gentle introduction, especially suited for domain experts. The second one can also serve as reference. |
We will touch central object-oriented concepts Class, Object, Attribute, Association, Composition, and Multiplicity in an example below, but work through above sources to get a deeper understanding and to enhance your modeling skills.
Note that above sources differentiate between conceptual and detailed models. All in all we go for detailed models, since only these contain enough information to generate code. Having said this, it is usually a good idea to have two or three conceptual iterations at a white board to agree on the broad approach before going too much into detail. But even if one starts with Ecore models right away, these also can be adapted any time to follow a new train of thought.
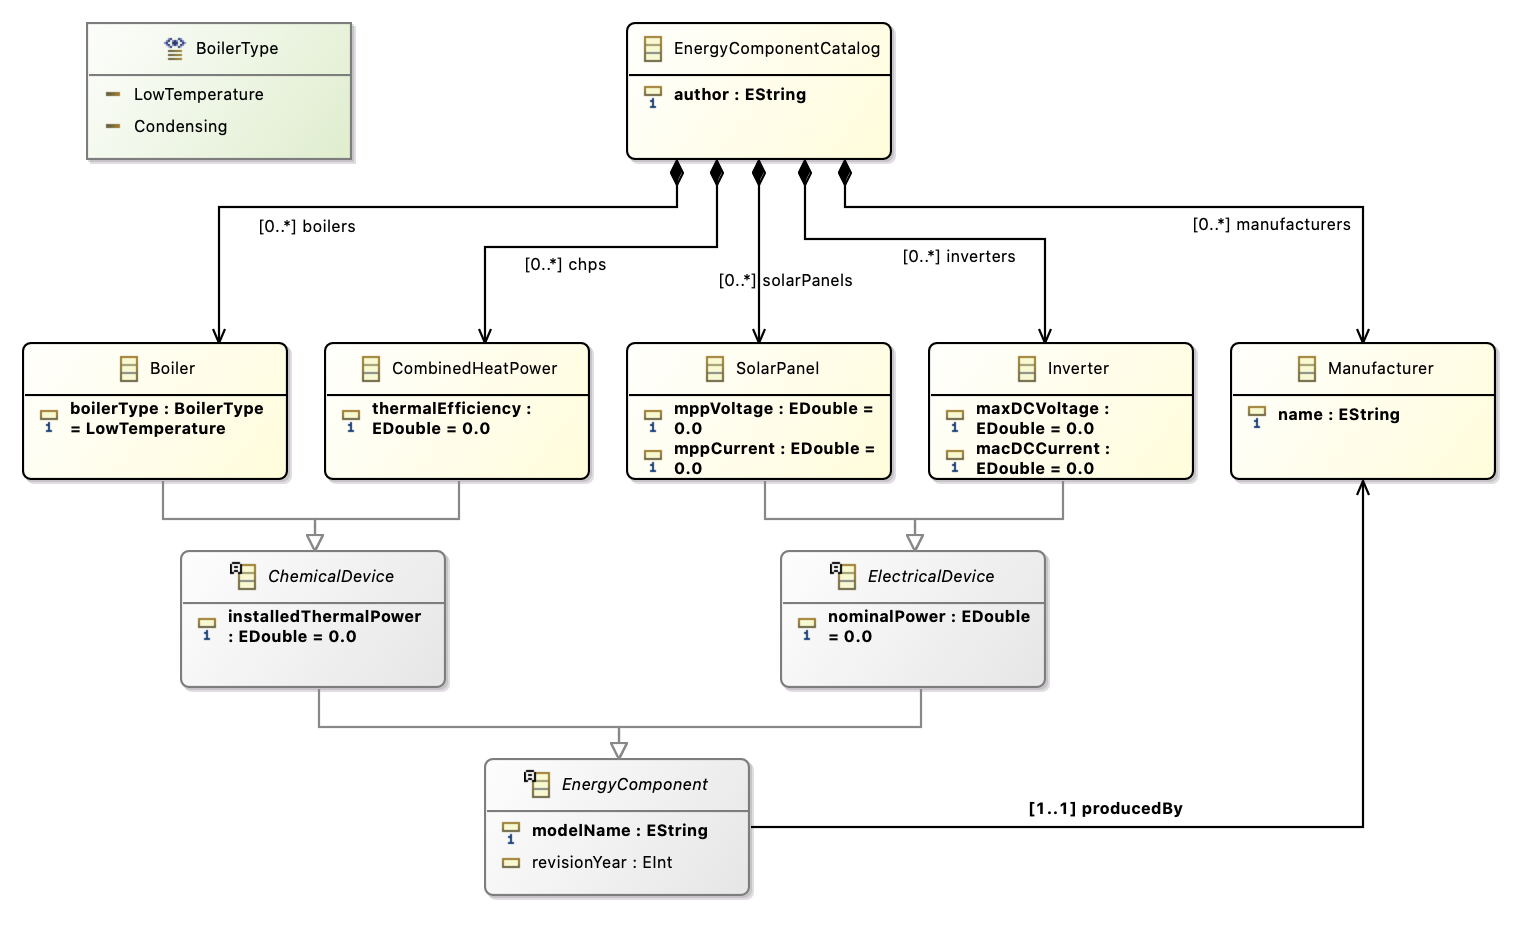
See here the essential and typical structure of a parameter catalog in a class diagram. Instead of artificial example classes like Foo and Bar it shows classes from an existing catalog, albeit in very condensed form.
\n@startuml
together {
  class SolarPanel
  class Inverter
}

class EnergyComponentsCatalog {
    author: String
}

abstract class EnergyComponent {
    modelName: String
    revisionYear: int
}

abstract class ChemicalDevice {
    installedThermalPower: double
}

abstract class ElectricalDevice {
    nominalPower : double
}

class Boiler {
    type : BoilerType
}

class CombinedHeatPower {
    thermalEfficiency : double
    electricalEfficiency : double
}

class Manufacturer {
    name : String
}

enum BoilerType {
  LowTemperature
  Condensing
}

class SolarPanel {
    mppVoltage : double
    mppCurrent : double
}

class Inverter {
    maxDCVoltage : double
    maxDCCurrent : double
}

BoilerType -[hidden]- Boiler

ElectricalDevice --|> EnergyComponent
SolarPanel --|> ElectricalDevice
Inverter --|> ElectricalDevice
ChemicalDevice --|> EnergyComponent
Boiler --|> ChemicalDevice
CombinedHeatPower --|> ChemicalDevice

EnergyComponentsCatalog *-- "0..*" Inverter: inverters
EnergyComponentsCatalog *-- "0..*" SolarPanel: solarPanels
EnergyComponentsCatalog *-- "0..*" Boiler: boilers
EnergyComponentsCatalog *-- "0..*" CombinedHeatPower: chps
EnergyComponentsCatalog *-- "0..*" Manufacturer: manufacturers
EnergyComponent -up-> "1..1" Manufacturer: producedBy
@enduml
The diagram models four types of technical components whose data shall be stored in the catalog, e.g. for parameterization of simulation models later: Boiler, CombinedHeatPower, SolarPanel, and Inverter.
The catalog itself is represented by class EnergyComponentsCatalog. Unlike dozens, hundreds, or even thousands of objects to be cataloged — Boilers, Inverters etc. — there will be just exactly one catalog object in the data representing the catalog itself. Its "singularity" is not visible in the class diagram, but an Ecore convention requires that all objects must form a composition hierarchy with only one root object.
If, in the domain, one object is composed of others, this is expressed by a special kind of association called composition.
Compositions are depicted as a link with a diamond shape attached to the containing object. In the Boiler case said link translates to: The EnergyComponentsCatalog contains — or is composed of — zero or more (0..*) boiler objects stored in a list named boilers.
|
Note that class names — despite the fact that they model a set of similar objects — are always written in singular! Names for list-like associations and attributes usually are written in plural form. |
Besides composition of objects, the model above shows another, completely different, kind of hierarchy: the inheritance hierarchy between classes. Whenever classes of objects share the same attributes or associations, we don’t like to repeat ourselves by adding that attribute or relation to all classes again and again. Instead, we add a super class to define common attributes and associations and connect it to sub classes that will automatically inherit all the features of their super class.
In our example above, common to all four energy components are attributes modelName and revisionYear, thus these are modeled by class EnergyComponent that is directly or indirectly a super class of Boiler, CombinedHeatPower, SolarPanel, and Inverter.
Similar, Boiler and CombinedHeatPower share attribute installedThermalPower factored out by class ChemicalDevice.
SolarPanel and Inverter share attribute nominalPower modeled in abstract class ElectricalDevice.
You probably noticed a fifth type of objects contained in the catalog, namely Manufacturer objects stored in list manufactureres.
How come? Ok, here is the story:
Exp: “I’d like to store a component’s manufacturer. Shall I add a String attribute manufacturerName to all classes like Boiler, Inverter and so on to store the manufacturer’s name?”
Dev shudders: “Well, what do you mean by "… and so on"?”
Exp: “Basically, I mean all energy components.”
Dev: “Fine. We already have a class representing all those energy components, brilliantly named EnergyComponent. Thus, we can define manfacturerName there, following one of Developer’s holy principles: "DRY — Don’t repeat yourself!"
By the way: Is the name all you want to know about manufacturers?”
Exp: “Mhm, maybe we need to know if they are still in business …”
Dev: “… or even since when they were out of business, if at all …”
Exp: “… and the country or region they are active.”
Dev: “Ok, so it’s not just the name — we need a class Manufacturer to model all these information.”
Exp sighs.
Dev: “Come on, its not that hard to add a class to our data model, isn’t it?”
Exp: “Ok, but how can we express what components a manufacturer produces?”
Dev: “Wasn’t it the other way around? I thought, you just wanted to know the manufacturer of a component?”
Exp: “What is the difference?”
Dev: “In data modeling, it is the difference between a uni-directional and a bi-directional association.”
Exp: “…?”
Dev: “Let’s put it that way: The difference between a link with an arrow on one side or on both sides.”
Exp: “Ok. We don’t need a list of components per manufacturer, but simply a reference from the component to its manufacturer.”
Dev: “Fine, then in Ecore please create a simple reference from class EnergyComponent to class Manufacturer, maybe named producedBy.”
Exp: “I will try this and get back to you.”
Dev: “Fine … good meeting.”
Observe in our data model, reference producedBy points from EnergyComponent to Manufacturer making it uni-directional reference.
One can simply query the manufacturer of a product, but not so the other way around.
With a bi-directional reference both queries would be available.
Observe also the annotations 0..* and 1..1 near class Manufacturer.
These are multiplicities of associations: An EnergyComponentsCatalog contains zero, one, or many objects of class Manufacturer and an EnergyComponent must reference exactly one manufacturer — not less, not more.
To recapitulate: Our example parameter catalog already exhibits all four types of relations provided by Ecore.
You find these in the Ecore editor’s palette shown here.
To create a relation between a sub class and a super class use tool SuperType.
Use the other tools to create an association between classes, may it be a simple (uni-directional) reference, a bi-directional reference, or a composition.
Obviously, attributes are central in data modeling.
Create one by dragging it from the palette onto our one and only class so far: EnergyComponentsCatalog.
The class symbol will turn red to indicate an error.
Hover with the mouse pointer over the new attribute and a tooltip with a more or less helpful error message will appear.
Current error is caused by that no data type was set for the new attribute.
Data types for attributes can be integer or floating point numbers, strings, dates, booleans, and more.
To get rid of the error:
-
If not already selected, select new attribute by clicking at it in the editor.
-
In view Properties find
ETypeand click button…to see a quite long list of available data types. -
Choose
EString [java.lang:String]from the list and the error is gone.
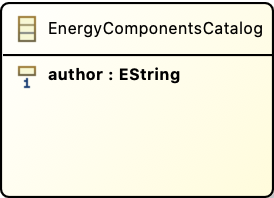
Change the attribute’s name to author and the class should look like shown here.
Most data types to choose from begin with letter E like in Ecore. These are just Ecore enabled variants of the respective Java types, thus, choose EInt for an int, EFloat for a 32 bit floating point number, EDouble for a 64 bit one, and so on.
Ecore allows to introduce new data types. We employ this feature later to enable data models with physical units and quantities.
There exists one other means to define the values an attribute can take, namely enumerations of distinct literals. Take Monday, Tuesday, Wednesday, … as a typical example for representing weekdays.
In our example data model you’ll find one Enumeration named BoilerType with values LowTemperature and Condensing.
The next section deals with generation of Java code from data models. To have more to play with, please implement our example model in Ecore now.
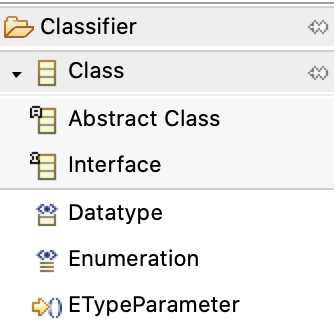
To do this, there is one more thing to know about classes: the difference between ordinary classes and abstract classes. 'Ordinary class' doesn’t sound nice, therefore, classes that are not abstract are called concrete classes. Our example diagram depicts abstract classes with letter A while concrete classes are labeled with C. You add abstract classes to a model with a special palette tool shown here.
The thing is: Objects can be created for concrete classes only!
In our example, it makes no sense to create an object from class EnergyComponent, because there is not such a thing like an energy component per se. Therefore, this class is abstract. It is true that an inverter is an energy component, thus inheriting all its features, but it was created as Inverter, not as EnergyComponent.
Super classes will be abstract most of the time.
So my advice is: Model a super class as abstract class unless you convince yourself that there exist real objects in the domain that belong to the super class but, at the same time, do not belong to any of its sub classes.
In the Ecore editor properties view, you can specify if a class is abstract or not, simply by toggling check box Abstract.
Two more tips and you are ready to rock and roll! — At least with your homework.
|
An exhaustive user manual for Ecore diagram editor is available. Execute |
|
If Ecore models get bigger, you may find it more convenient to work with a form based UI instead of, or in addition to, the diagram editor.
Open this kind of editor via command |
Generation of Java Code from Data Model
By now, your Ecore model should look like this:
Let us bring the model to life, that is, generate code from it that creates, reads, updates, and deletes concrete data objects of modeled classes in computers. I would like to tell you that this is done with just one click but, actually, you need two or three:
-
Make sure all files are saved (
File → Save All) -
Execute
Generate → Model Codefrom the context menu of Ecore editordemocatalog -
Execute
Generate → Edit Codefrom the same context menu
|
Please do not execute 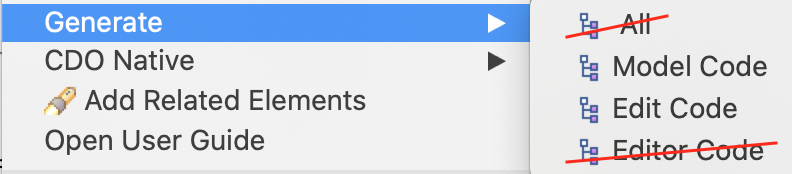
This would create code for a simple user interface, but we use more advanced EMF Forms for that later.
If, by mistake, project |
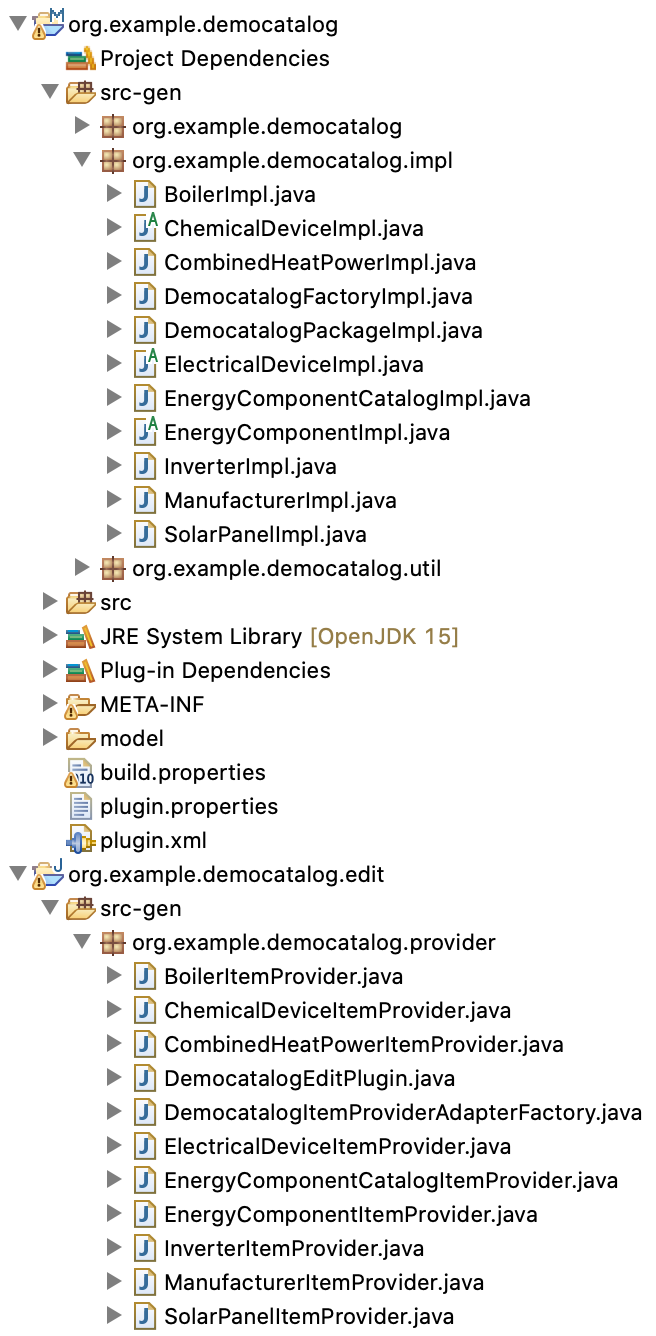
Generate → Model Code creates classes that represent the modeled data in code. These classes are located in three packages under directory src-gen in org.example.democatalog.
Generate → Edit Code creates a whole new Eclipse project named org.example.democatalog.edit, again with generated classes under directory src-gen.
You may have a look at some Java classes for curiosity by double clicking at them in Model Explorer. There is no point in trying to understand the code in detail, but observe token @generated present in the comments of all classes, fields and methods. Classes, fields and methods marked with this token are (re)generated whenever above commands are executed.
Sometimes it maybe required to manually adapt generated code — after all our concern is "low code", not "no code" development. In that case, we will replace @generated by @generated NOT to prevent code regeneration.
After code generation, you may have noticed some warnings showed up in view Problems.
In general, it is highly recommended to resolve warnings, and errors of course, but we will make an exception from the rule, since the warnings are uncritical and would reappear each time code is regenerated.
Generation and Tweaking of User Interface
In this section you will learn how to generate and tweak a CRUD user interface based on Ecore data model and Java classes created for our demo parameters catalog above. Topics described here are discussed in more detail in tutorial Getting started with EMF Forms. To find out what user interface controls and layouts are provided by this framework have a look at EMF Forms – View Model Elements. EMF Forms is already part of package Eclipse Modeling Tools, so we can create a third Eclipse project/plugin that implements a user interface for editing catalog data without further ado:
-
In the Model Explorer execute
EMF Forms → Create View Model Projectfrom context menu overdemocatalog.ecore -
Leave project name
org.example.democatalog.viewmodelas is but uncheckUse default location— as we always do — and browse to the directory containingorg.example.democatalog -
Click
Next >and selectEnergyComponentsCatalogas data element we want to create a user interface for -
Leave
Fill view model with default layoutchecked and clickFinish.
According to these inputs a new project is created with file EnergyComponentsCatalog.view under directory viewmodels.
This file opens automatically in a special View Editor.
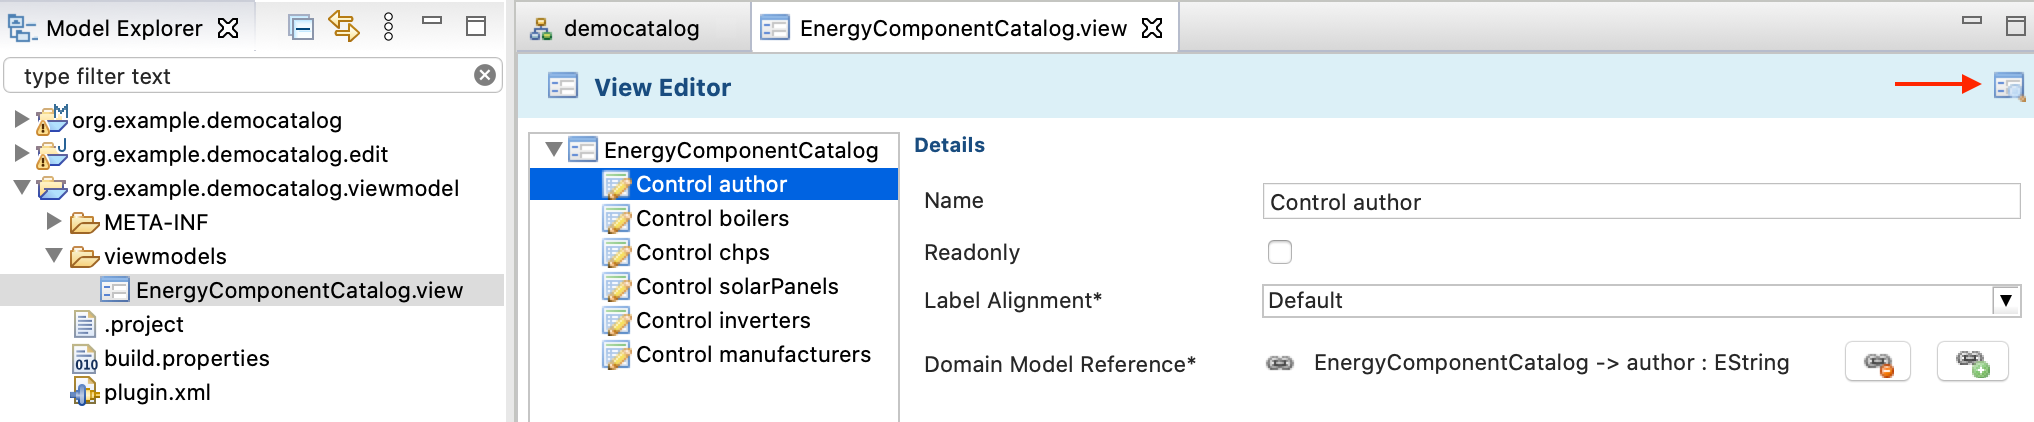
Like the data of our catalog are modeled as Ecore file using a dedicated graphical editor, so will our catalog’s user interface be modeled in .view files, again using a special editor.
Since we opted for Fill view model with default layout the catalog’s UI is filled initially with default controls for all data items assigned to Ecore type EnergyComponentsCatalog like a string control for author or list controls for boilers, chps, and so on.
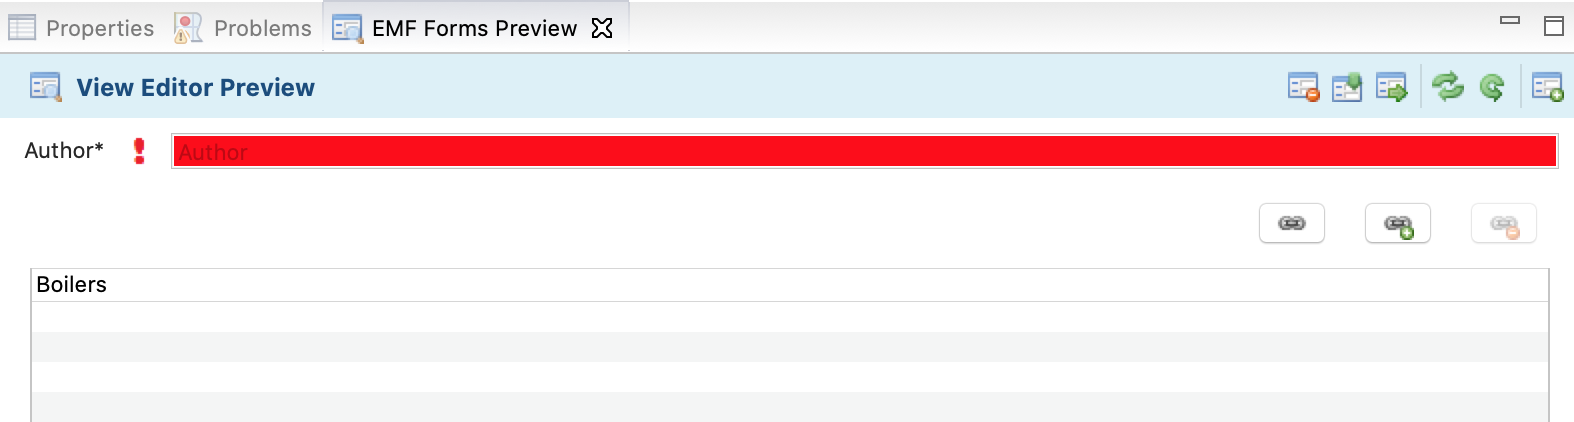
See red arrow in the above screen-shot? It points to a button that opens a functional preview of the modeled user interface.
|
Double click on tab EMF Forms Preview to enlarge view for better handling — double click again to get back. Enable auto refresh mode Given your screen is big enough, you may want to dock-out the preview by dragging tab EMF Forms Preview out of Eclipse’s main window. Seeing editor and preview side by side is a great way to explore the possibilities of view models. |
Red input field and exclamation mark in the preview signal missing or inconsistent data.
Ecore data model specifies attribute author with a lower bound of one, meaning it is a mandatory attribute.
As soon as an author’s name is provided, the error indication disappears.
This is what functional preview means.
You can even create new boilers or other objects in lists provided, with all forms created "automagically" with respect to our underlying Ecore data model.
Of course, such automatic approach has its limits. In our case, a long list of lists is not very user-friendly, because one has to scroll up and down to find a specific list. Also, no specific object data are shown in the list and data can only be edited in a pop-up form (no inline editing).
How should a better UI look and feel like?
If there are many lists (types) of entities — the normal case for parameter catalogs — users should select what list they want to work with by selecting it from a list or tree view that is always visible, the master view. Once a type is selected in the master view, a table with all objects of this list/type shall appear sidelong in a detail view, ready for editing.
In EMF Forms master-detail-views can be modeled either with Categorization or Tree Master Detail UI components. The latter not only allows to edit information displayed in the detail view, but also the tree of elements in the master view. Opposed to that, a Categorization presents a fixed hierarchy of elements to choose from. This is exactly what we need as there are only a fixed number of types of objects to be edited in a parameters catalog.
Adding Tables to the UI
But first, we replace the default controls for lists of boilers, chps, and so on by tables. As shown here, select all list controls in the view model and execute Delete from context menu. Refresh View Editor Preview to verify that only field Author* is left.

Next, create a table that shall display all boilers in a catalog:
Select EnergyComponentsCatalog, activate context menu and choose TableControl from the list of available UI elements.
(EnergyComponentsCatalog represents the root view of the UI and, as such, accepts quite a lot of different UI components as child components.)
Entry TableControl was inserted into the list of interface elements below Control author.
Checking updated preview reveals no table but a message basically saying that a reference to the domain model is missing, in other words: EMF Forms does not know yet what data to present in table.
Click on entry TableControl to see its details.
A red exclamation mark indicates the missing Domain Model Reference*.
Click on ![]() and be ready to chase a sequence of dialogs:
and be ready to chase a sequence of dialogs:
-
Click on another
 in dialog
 Configure TableDomainModelReference -
In wizard
New Reference Elementselectmodel → FeaturePathDomainModelReferenceand clickNext > -
Click
Link Domain Model EFeatureand in appearing pop-up list choose reference to list of objects you want to edit in the table, e.g.boilers; confirm withOKsafely ignoring warning about missingPropertyDescriptor. -
FinishwizardNew Reference Element -
FinishdialogConfigure TableDomainModelReference.
This was some work, but as reward we get a fully specified table control in View Editor that "translates" into a preview where we can create, read, update, and delete boilers.
Moreover, clicking at a table header sorts all objects in it (rows) according to the values in this column. Column widths can adapted, too.
Table UIs can be tweaked in many ways, e.g. selection and sequence of columns can be declared via list Column Domain Model References. To fill this list with defaults, execute Generate Columns from table control’s context menu. Reorder them as you like or delete columns that are not important to the user.
Notice here an important overall feature of EMF Forms: If something is left unspecified, be it the view model for an Ecore object type or the specification of table columns, EMF Forms will always find a default solution! Applied to columns specification this means we get default columns automatically back in the moment the last column is removed from list Column Domain Model References.
If explicit column specifications are present further configurations can be added to a table control from its context menu, e.g. initial column widths or read-only status of columns. See here for details.
By default only attributes are displayed and directly editable in tables while references to other objects — in our case the reference to a manufacturer — are not.
To get the default (sic!) editing panel for an selected table row, in View Editor just set Detail Editing* from None to WithPanel, press Tab, and save. For boilers, EMF Forms will create the editing panel shown here. Regardless wether users edit data in the panel or directly in the table — both will stay in sync any time.
|
View editor exhibits an irritating behavior: With preview auto-refresh turned on, any change in the details view is reflected instantly in the preview, even without saving the form or leaving the edited field. On the other hand, saving an updated view editor only takes into account edited fields after they have lost focus, e.g. by pressing Tab key or clicking with the mouse into another field. So, saving a form before the focus has shifted from the last edited field won’t honor this edit, that is you won’t necessarily get what you see. |
One last thing: Enter boilers as name for the table control so we can distinguish it from the other four table controls to come.
Yes! … Please repeat above procedure to create table controls for chps, solar panels, inverters and manufacturers, too. I did this in about 3 minutes. ;-)
Master-Detail View with Categories
In last section we improved our catalog’s UI by replacing simple object lists by tables that can be sorted, customized and edited inline as well as in an associated panel. Alas, instead a list of lists we have got an even bigger list of tables.
High time to introduce a master-detail view that presents categories of object types in a master view and, after one is selected, the according object table in the detail view.
Add a Categorization view to the list of UI elements in View Editor by selecting EnergyComponentsCatalog and choose Categorization from its contect menu.
Now add two Composite Category elements and one Leaf Category to Categorization from according context menu. This gives us three top level entries in the hierarchy.
In the same way add two Leaf Category elements to each Composite Category resulting in the hierarchy depicted here.
This screen shot shows the view model of our UI when finished. To get there:
-
Select UI element
Categorizationand rename it toCategories -
Rename composite and leaf categories as depicted here
-
Drag all table controls one by one into the suited leaf category
-
Confirm master-detail view works as expected in the preview.
|
The UI hierarchy to access tables for entity types is independent, and usually will differ, from aggregation and inheritance hierarchies present in Ecore data model (compare fig. Example Model). |
Note that EMF Forms Preview provides these buttons  to clear, load and store edited data.
In fact, this feature gives us a fully functional prototype.
At least during refinement of model and UI, data sets can be created, edited, and tested for usability without the need to built a full blown, deployable application — see parts Accessing and Using Parameter Catalogs and Build (Parameter Catalog) Applications with Eclipse Tycho below.
to clear, load and store edited data.
In fact, this feature gives us a fully functional prototype.
At least during refinement of model and UI, data sets can be created, edited, and tested for usability without the need to built a full blown, deployable application — see parts Accessing and Using Parameter Catalogs and Build (Parameter Catalog) Applications with Eclipse Tycho below.
Be aware that in some cases the view model must adapt to changes in data model, e.g. a new leaf category and table component must be created for a new catalog object type. Other changes are automatically reflected in the generated UI, at least for default forms and default table columns. To our convenience, view model specifications incompatible with data model are indicated by error badges in the View Editor.
Changes in data model also can make existing XML data incompatible. There are tools for data migration, but for now, recreation of test data or manual editing of XML file is the way to go.
Summary
What have we achieved so far?
We created a graphical Ecore data model with a catalog class and five classes/types of objects therein. Classes have been defined by name, attributes, and relations between them, often with cardinalities. Whenever classes shared some attributes or references we factored these out into super classes. An enumeration introduced a new attribute type as a set of named values.
From this data model, we issued commands to create Java code for representing the data in memory as well as to store and retrieve them on and from disk. Methods to create, read, update and delete data objects (CRUD) were generated, too.
Lastly, we thought about a good user interface for this data and used EMF Forms to model it resulting in a full functional prototype.
Bonus: Solutions for Specific Modeling Problems
Add Units to the Mix
TBD
As mentioned earlier, parameter catalogs for simulations should be able to represent quantities, not just bare integer and real numbers.
using Indrya, the reference implementation for Units of Measurement in Java (JSR 385)
To this end, the author has created two Eclipse plug-in projects providing this feature to be used by Ecore and EMF Forms.
Third-party libraries like Indrya, usually, are not distributed as plug-ins, but Tycho can wrap them automatically as OSGi plug-ins that can added directly to our application.
Another plug-in, created by the author connects the Ecore and Indrya. We will compile it from source code, simply by importing the projects.
-
Copy to file system …
-
Import project but not copying it in the workspace (just linking)
Represent Functions in a Parameter Catalog
TBD
for creating custom UI labels:
-
ExponentialFunctionItemProvider.java -
LinearFunctionItemProvider.java -
TableFunctionItemProvider.java
Custom code marked with @generated NOT in de.hftstuttgart.energycomponents.provider in project de.hftstuttgart.energycomponents.edit
How to Model Derived References and Attributes
TBD
We haven’t used derived references or attributes by now. But if one has to implement some by providing a getter, it is necessary to return an unmodifiable list like BasicEList.UnmodifiableEList or EcoreUtil.unmodifiableList(…) instead of EList as described here: https://www.ntnu.no/wiki/plugins/servlet/mobile?contentId=112269388#content/view/112269388 .